Wednesday, May 11, 2022

The Office

The house where we live is old (pushing 100 years at this point) and weird. Beyond the usual old-house things, where nothing is quite square or plumb and the 2x4s are actually 2x4 and not 1.5x3.5 and the wiring and outlets are insufficient, the semi-finished upstairs is peculiarly shaped. It doesn't have rooms so much as it has a series of connected room-like spaces with sloping ceilings (because it's just under the roof) and other oddities. When we moved in [uncomfortably large number redacted] years ago, we had plans for that space. We were going to build them out into actual useful spaces: an office, a guest room, a lounge, a library. And we made a start on some of that work. However, over time the upstairs became a default storage location. Not sure where to keep something? Put it upstairs. Most of those spaces ended up packed floor to ceiling with boxes and Rubbermaid containers. 

But a few months ago, we resolved to do something about it. We were going to reclaim the space and turn it into something useful, one area at a time. And the first space was going to be one designated to be my office.

Once I got all the boxes out, it looked like this:


It's about eight by fifteen feet altogether. The ceiling slopes under the roof, of course, so it's a bit over six feet at the highest, but mostly less than that. The room isn't well-defined because the space next to it more or less just opens into it. And there's an odd space divider built into the back of the room, with a closety area on the left and the right divided into upper and lower halves by a deep horizontal shelf.

So what does it look like now? Kinda like this:


Fresh paint, of course, a batch of new outlets bringing much needed power to the room. I got a batch of unfinished kitchen cabinets which provided a lot of storage and allow me to use a lot of the room under the sloping ceiling I couldn't otherwise use. I cut and finished some slabs of wood to serve as countertops and the desk surface, built shelves, and put in a number of little details. For example...

The area at the back of the room retains its original thirds, but the right-hand side is storage (long-term storage behind a useful triangle of whiteboard on top, a "tool shed" hiding my 3d printer among other things behind the accordion blind below. And the left-hand side behind the curtain got another desk surface, pegboard, a light, and a few other bits and pieces to become an arty workspace: 

Then there's the empty area of floor near the back of the room.


That design on the floor is a reproduction of the labyrinth at the cathedral of Amiens, possibly one of the easiest such designs to reproduce because it's all straight lines. It's a little lopsided near the middle, but it basically works, and it's well-sized for meeple pilgrimages.

There's memorabilia all over, since we conceived of the room as a sort of wunderkammer. This set of shelves near the back of the room houses, among other things, an astrolabe and a scientific balance dating to no later than 1947.

The cabinet next to that, to the left of the desk, houses a number of technical works, a couple of animals from Botswana, and a Cypriot icon. The icon is made from wood harvested from a forest burned during the Turkish invasion and was sold as a fund-raiser for refugees.

To the right of the desk, the tea station. Moroccan-ish tile, a small electric kettle, and (at the moment) a tea set from NCC-1701-D. Atop it, a small Cypriot vessel made in a style going back to the Neolithic (slow wheel, decorations applied after forming the main pot), an Acheulean-style hand axe I made from Napa county obsidian, and a souvenir from my time in Starfleet.

The other side of the room has the professional library, RPGs to the left, interesting and useful historical works to the right (both are a fraction of the whole library, of course; these are just key works). Memorabilia include a carved figurine I was given by my lovely and talented spouse and a kukri I picked up in Nepal. Most of the wall to the right, separating this room from the next, is new.


Between them, there are a few other bits. Above, there's a world map. If you look carefully at the pictures above, there's a small latch on the left. If you unlatch it, the map opens down to reveal a video screen.


Below that is the stone "mantel" (adhesive stone tile) and heater, an electrical heating element made to look like an iron stove. It'll be quite cozy once it gets cold again in, oh, November or so.


Natural light isn't great in that room despite the window, so it's supplemented by four lamps. I got some inexpensive Moroccan lanterns, did a bit of surgery to put light sockets into them, and hung them on the wall. And the fobs on the end of the pull chains? Dice.


And it's a bit subtle, but the ceiling has a scattering of stars. That thing just over the window is a page from a Buddhist text written in Pali on a leaf made from a disused monk's robe, stiffened with lacquer, and gilded.

It's a tiny space, then, but it's cozy, and there's room for a rotating display of memorabilia. But the next projects are furniture downstairs.


Tuesday, September 14, 2021

Night at the Cathedral

So I had a thought about a fun little 3d printing project. I picked up a few cheap night lights when I was at the hardware store, then after a little measuring got a Gothic-style window design off of Thingiverse, bent it into a semicircle, added a base so that it would fit onto the light the way the original transparent cover did, and then did a little stone texturing after printing it out. With a "lead" grid draw onto a clear plastic strip, it doesn't look half bad.

And when the light comes on, it continues to look right.

Pretty happy with this, at least as a small project. May try something more ambitious with a more elaborate rose window.


Monday, August 9, 2021

Hidden Door

Everybody who's read a Gothic novel, played a tabletop RPG, or otherwise enjoyed the cinematic and romantic has probably wanted a secret door to slip through at some point in their life. And when we moved into our house one person-old-enough-to-start-driving-years ago, I promised myself one. But even ignoring the lack of time to work on it, it's a difficult business. I had a couple of spots suitable for the exercise in our semi-finished upstairs, but it's an old (probably 1930) house where nothing's quite square or level and the dimensions are always a little off, so it's all custom work (I'm sure DIY hidden door kits are marvelous, but they're also on the expensive side and require better behaved architecture than I've got), and I'm ultimately a dreadful carpenter. But eventually, I got it.

So, hand-built bookcase in the little lounge/office space I have upstairs. The light blue paint matches most of the rest of the room, and the decorative weaving is something my grandmother made many years ago. The light at the top is covered with a decorative grille I 3d-printed. But what if we pull on the handles hidden around the corner?

The bookcase is fixed top and bottom to some yard-long drawer slides which let it go back and forth. There are also some casters which keep it from bending too far down. And farther back there are two more rooms (mostly storage right now, but we hope to recover them some day).


Friday, June 5, 2020

Board II: Process Shots

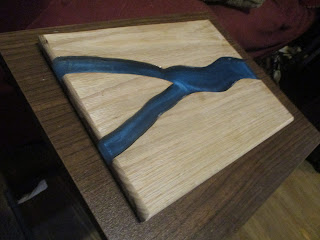
I made another one of those wood and resin charcuterie boards. First, pretty picture:


And this time I took pictures along the way.

I started out with a piece of purpleheart, about 12" x 6", and cut it into pieces.


Then into the box/tray, lined with packing tape and sprayed with mold release. I clamped down half the pieces to keep them from shifting when I poured the epoxy and and fixed the others in place with hot glue, to see if that would work as well.


This is after the first pour, limiting the depth to about a quarter inch.


Once that set, the pieces were firmly in place and I could remove the clamps.


After two more pours, I could unmold it. Came out cleanly again this time.


I used a hand plane to chip off an accidental drip of epoxy onto the wood, then off to the router table with a roundover bit to round off the edges.


I may, again, sand the edges a bit more and finish it with some oil or sealant, but this is pretty much done.

Sunday, May 31, 2020

Cyborg-Edge Charcuterie Board


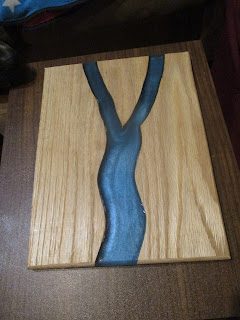
I've been looking at a lot of wood-and-epoxy objects, because I really like the combinations of shapes, colors, and textures. However, a lot of these are "live edge" pieces like this one here:


"Live edge" means that they're made from slices of an entire trunk or branch, preserving the natural curves and colors of the wood, and since you can use two consecutive slices from the big piece of timber you're cutting from, you can basically get a mirror image from two pieces for a symmetrical shape that still fits a rectangular table or cutting board footprint. That's awesome, but for that, you pretty much need some fairly costly pre-cut specialty lumber or access to a fallen tree and some serious equipment like a band saw, jointer, and thickness planer. Neither of these options are attractive for a test piece.

My solution was to create an artificial live edge. I started with a piece of oak board from the hardware store and used a jigsaw to cut a meandering curve down the middle. At the last minute, I decided to cut another bit out for another branch. I then knocked together a box out of scrap lumber: plywood to fit the length of the board but a few inches wider, and some strips for the sides. I covered the bottom and sides of the box interior with packing tape (because epoxy doesn't like to stick to smooth, shiny plastics) and then gave it a spritz of mold release spray (because nothing likes to stick to that). I used c-clamps to fix the bits of wood in place in the box. I didn't need a liquid-tight fit, just enough to keep them from shifting when I poured the epoxy.


The epoxy, a slow-hardening one, was remarkably well-behaved. I warmed both resin and hardener so that they'd lose bubbles a bit better, let the resin sit for several minutes for the larger bubbles to come out, and did the same for the fully mixed epoxy (thank you half-hour working time). Then it was just a matter of letting it harden overnight before pouring another layer. The bottom had some mica-based color for a semi-opaque effect giving it some depth, while I left the rest transparent. There are a few little patches of bubble around the edges, but I think that just adds to the natural stream look of the piece. And I managed to dodge the most troublesome aspect of epoxy: polishing. The upper surface of the board was never pressed against a mold, so it's nice and smooth.

So, then, I needed to plane off a few bits of epoxy which had spilled over, and I decided to round off the edges on the router table. I may still put a bit of butcher block oil on the board, but I think it's pretty good as-is. This turned out to be pretty easy and I'm starting another one. I hope to get some process shots of that.


Tuesday, April 21, 2020

Where We Keep All The Books

Like libraries? Yeah, we all like libraries. All of us who would read this, anyway. A good old-school library with old books and wood and plush leather furniture, like the private library at the Biltmore estate, the Morrison reading room at UC Berkeley, or Zatanna's libraryat Shadowcrest.

So last month, I built a Star Wars-themed book nook. Much fun, looks nifty on the shelf, but a bit wide and clumsily constructed in places. I learn a bunch and set out on another project. This one was far more complicated, but I think better thought out.


The library is made from three identically structured bays, boxes about three by four by nine inches cut on the CNC machine, with arch-shaped cutouts on two facing long sides, box-joint edges, and a few holes here and there for various reasons.
 

The platforms for the "balconies" are CNC'd as well, but most of the rest of the furnishings are are 3d printed. The bookshelves are from a modular bookshelf design on Thingiverse. I flipped a few of the shelf designs horizontally, so the arrangements of volumes are even more different than in the original design, and every single spine and scroll is individually painted.


 And there were a few other printed bits: the spiral staircase, the railings, the fireplace, and the table. The floors are images of Persian rugs printed on matte photo paper.


After assembling each bay, I ran a long string of LED lights behind the walls, poking bulbs through pre-drilled holes. 


I had hoped to make an infinite library, but that didn't work out. I've done infinity mirrors before, and the principle is simple: mirror in back, semi-mirrored window film in front, lights in between. The problem is that you need a lot of light, and I wasn't generating enough. Still, putting a mirror in the back makes it look twice as deep as it actually is, which isn't bad.


The hardest part is, of course, finding enough room on the shelves to put it.


Now all I need to do is find this much real shelf space.

Friday, March 6, 2020

Witness The Power Of This Fully Operational Bookshelf

Not long ago, certain persons to whom I am married introduced me to the idea of book nook inserts, basically little dioramas scaled for bookshelves. While they take up valuable space on what are surely crowded shelves, they are quite nifty. So I thought I'd give it a shot.

I had a number of ideas, but the first one was something Death Star-like. Naturally, it was 3d printing to the rescue. The parts are mostly from a Death Star diorama set and and a bunch of Death Star surface tiles from this guy. Print, prime a uniform gray, add on a few accents here and there, finish with a thin, dark wash, and glue to the inside of an improvised box. I added some LED lights (mostly shining through custom drilled holes) and a landing platform for a TIE fighter.


For a first attempt, I think it went tolerably well. It's wider than I'd like (wasn't really sure how it would come out, but I can use this as a gauge for how much narrower to make it), but it does give the impression of Death Star-ness. And I have ideas for more...