I've been looking at a lot of wood-and-epoxy objects, because I really like the combinations of shapes, colors, and textures. However, a lot of these are "live edge" pieces like this one here:
"Live edge" means that they're made from slices of an entire trunk or branch, preserving the natural curves and colors of the wood, and since you can use two consecutive slices from the big piece of timber you're cutting from, you can basically get a mirror image from two pieces for a symmetrical shape that still fits a rectangular table or cutting board footprint. That's awesome, but for that, you pretty much need some fairly costly pre-cut specialty lumber or access to a fallen tree and some serious equipment like a band saw, jointer, and thickness planer. Neither of these options are attractive for a test piece.
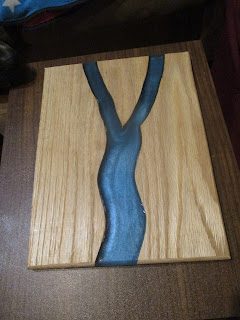
My solution was to create an artificial live edge. I started with a piece of oak board from the hardware store and used a jigsaw to cut a meandering curve down the middle. At the last minute, I decided to cut another bit out for another branch. I then knocked together a box out of scrap lumber: plywood to fit the length of the board but a few inches wider, and some strips for the sides. I covered the bottom and sides of the box interior with packing tape (because epoxy doesn't like to stick to smooth, shiny plastics) and then gave it a spritz of mold release spray (because nothing likes to stick to that). I used c-clamps to fix the bits of wood in place in the box. I didn't need a liquid-tight fit, just enough to keep them from shifting when I poured the epoxy.

The epoxy, a slow-hardening one, was remarkably well-behaved. I warmed both resin and hardener so that they'd lose bubbles a bit better, let the resin sit for several minutes for the larger bubbles to come out, and did the same for the fully mixed epoxy (thank you half-hour working time). Then it was just a matter of letting it harden overnight before pouring another layer. The bottom had some mica-based color for a semi-opaque effect giving it some depth, while I left the rest transparent. There are a few little patches of bubble around the edges, but I think that just adds to the natural stream look of the piece. And I managed to dodge the most troublesome aspect of epoxy: polishing. The upper surface of the board was never pressed against a mold, so it's nice and smooth.
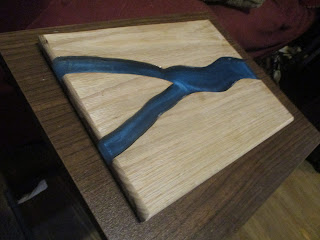
So, then, I needed to plane off a few bits of epoxy which had spilled over, and I decided to round off the edges on the router table. I may still put a bit of butcher block oil on the board, but I think it's pretty good as-is. This turned out to be pretty easy and I'm starting another one. I hope to get some process shots of that.