Friday, June 5, 2020

Board II: Process Shots

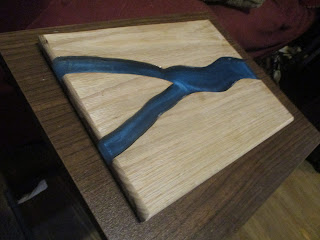
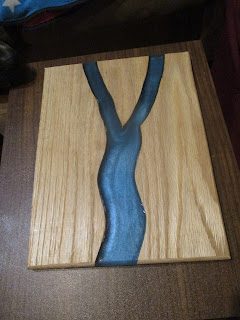
I made another one of those wood and resin charcuterie boards. First, pretty picture:


And this time I took pictures along the way.

I started out with a piece of purpleheart, about 12" x 6", and cut it into pieces.


Then into the box/tray, lined with packing tape and sprayed with mold release. I clamped down half the pieces to keep them from shifting when I poured the epoxy and and fixed the others in place with hot glue, to see if that would work as well.


This is after the first pour, limiting the depth to about a quarter inch.


Once that set, the pieces were firmly in place and I could remove the clamps.


After two more pours, I could unmold it. Came out cleanly again this time.


I used a hand plane to chip off an accidental drip of epoxy onto the wood, then off to the router table with a roundover bit to round off the edges.


I may, again, sand the edges a bit more and finish it with some oil or sealant, but this is pretty much done.

Sunday, May 31, 2020

Cyborg-Edge Charcuterie Board


I've been looking at a lot of wood-and-epoxy objects, because I really like the combinations of shapes, colors, and textures. However, a lot of these are "live edge" pieces like this one here:


"Live edge" means that they're made from slices of an entire trunk or branch, preserving the natural curves and colors of the wood, and since you can use two consecutive slices from the big piece of timber you're cutting from, you can basically get a mirror image from two pieces for a symmetrical shape that still fits a rectangular table or cutting board footprint. That's awesome, but for that, you pretty much need some fairly costly pre-cut specialty lumber or access to a fallen tree and some serious equipment like a band saw, jointer, and thickness planer. Neither of these options are attractive for a test piece.

My solution was to create an artificial live edge. I started with a piece of oak board from the hardware store and used a jigsaw to cut a meandering curve down the middle. At the last minute, I decided to cut another bit out for another branch. I then knocked together a box out of scrap lumber: plywood to fit the length of the board but a few inches wider, and some strips for the sides. I covered the bottom and sides of the box interior with packing tape (because epoxy doesn't like to stick to smooth, shiny plastics) and then gave it a spritz of mold release spray (because nothing likes to stick to that). I used c-clamps to fix the bits of wood in place in the box. I didn't need a liquid-tight fit, just enough to keep them from shifting when I poured the epoxy.


The epoxy, a slow-hardening one, was remarkably well-behaved. I warmed both resin and hardener so that they'd lose bubbles a bit better, let the resin sit for several minutes for the larger bubbles to come out, and did the same for the fully mixed epoxy (thank you half-hour working time). Then it was just a matter of letting it harden overnight before pouring another layer. The bottom had some mica-based color for a semi-opaque effect giving it some depth, while I left the rest transparent. There are a few little patches of bubble around the edges, but I think that just adds to the natural stream look of the piece. And I managed to dodge the most troublesome aspect of epoxy: polishing. The upper surface of the board was never pressed against a mold, so it's nice and smooth.

So, then, I needed to plane off a few bits of epoxy which had spilled over, and I decided to round off the edges on the router table. I may still put a bit of butcher block oil on the board, but I think it's pretty good as-is. This turned out to be pretty easy and I'm starting another one. I hope to get some process shots of that.


Tuesday, April 21, 2020

Where We Keep All The Books

Like libraries? Yeah, we all like libraries. All of us who would read this, anyway. A good old-school library with old books and wood and plush leather furniture, like the private library at the Biltmore estate, the Morrison reading room at UC Berkeley, or Zatanna's libraryat Shadowcrest.

So last month, I built a Star Wars-themed book nook. Much fun, looks nifty on the shelf, but a bit wide and clumsily constructed in places. I learn a bunch and set out on another project. This one was far more complicated, but I think better thought out.


The library is made from three identically structured bays, boxes about three by four by nine inches cut on the CNC machine, with arch-shaped cutouts on two facing long sides, box-joint edges, and a few holes here and there for various reasons.
 

The platforms for the "balconies" are CNC'd as well, but most of the rest of the furnishings are are 3d printed. The bookshelves are from a modular bookshelf design on Thingiverse. I flipped a few of the shelf designs horizontally, so the arrangements of volumes are even more different than in the original design, and every single spine and scroll is individually painted.


 And there were a few other printed bits: the spiral staircase, the railings, the fireplace, and the table. The floors are images of Persian rugs printed on matte photo paper.


After assembling each bay, I ran a long string of LED lights behind the walls, poking bulbs through pre-drilled holes. 


I had hoped to make an infinite library, but that didn't work out. I've done infinity mirrors before, and the principle is simple: mirror in back, semi-mirrored window film in front, lights in between. The problem is that you need a lot of light, and I wasn't generating enough. Still, putting a mirror in the back makes it look twice as deep as it actually is, which isn't bad.


The hardest part is, of course, finding enough room on the shelves to put it.


Now all I need to do is find this much real shelf space.

Friday, March 6, 2020

Witness The Power Of This Fully Operational Bookshelf

Not long ago, certain persons to whom I am married introduced me to the idea of book nook inserts, basically little dioramas scaled for bookshelves. While they take up valuable space on what are surely crowded shelves, they are quite nifty. So I thought I'd give it a shot.

I had a number of ideas, but the first one was something Death Star-like. Naturally, it was 3d printing to the rescue. The parts are mostly from a Death Star diorama set and and a bunch of Death Star surface tiles from this guy. Print, prime a uniform gray, add on a few accents here and there, finish with a thin, dark wash, and glue to the inside of an improvised box. I added some LED lights (mostly shining through custom drilled holes) and a landing platform for a TIE fighter.


For a first attempt, I think it went tolerably well. It's wider than I'd like (wasn't really sure how it would come out, but I can use this as a gauge for how much narrower to make it), but it does give the impression of Death Star-ness. And I have ideas for more...