Showing posts with label 3d. Show all posts

Wednesday, November 2, 2022

Cathedral Window


When I was putting together the new office, I had an ambition to do the outside-facing wall as a fake stone wall in more or less this style using painted styrofoam sheets. I ended up not doing so for a number of reasons (time and effort, fragility in a place where I'd be moving in some bulky furniture, etc.), but I still liked the idea. This came up again as I was looking at the end of one of the cabinet sections. The prefab cabinets have nice wood facings, but the sides are particle board. 

Ugly, but less expensive if you're lining up a bunch of them. If they're not entirely sandwiched between walls, you can buy a separate facing to put on the one at the exposed end. but we can do better than that, can't we?

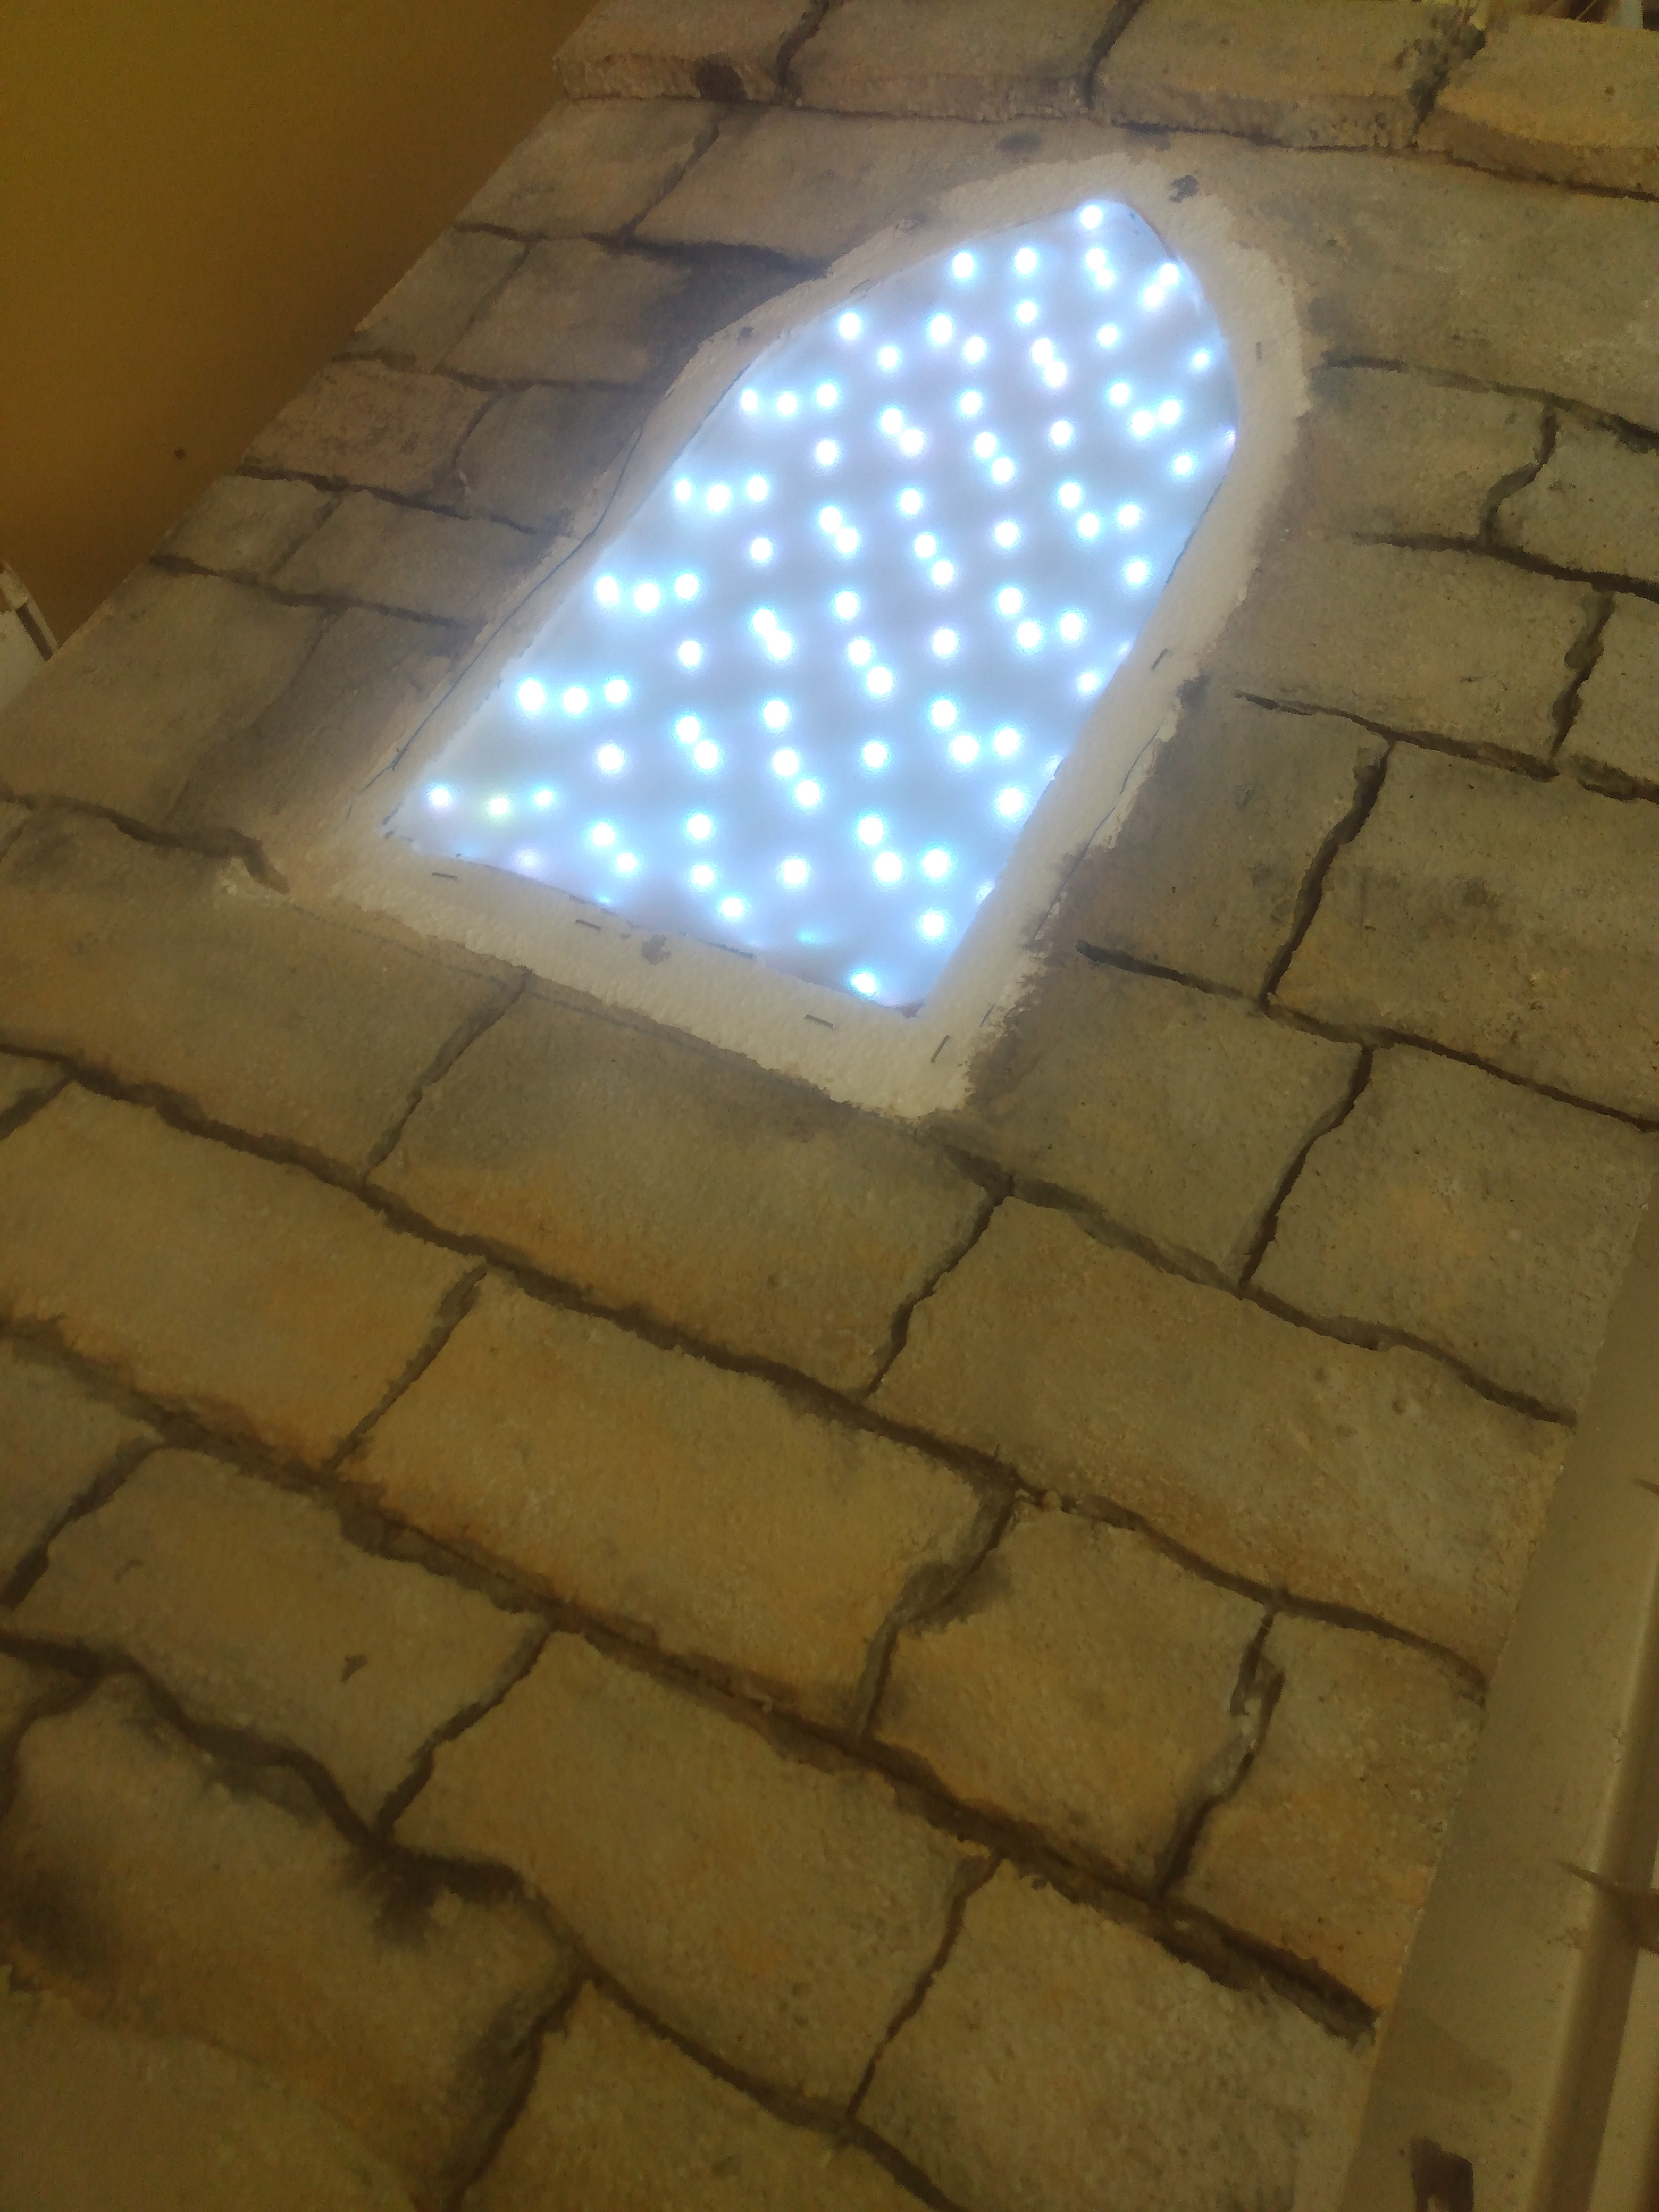
My basic idea was to turn that end into an illuminated window with a pointed arch using a strip of LEDs for a light source. I've got them kicking around, so why not? Step one was to get a suitable design for the window proper and get that together with the 3d printer. I sized it sufficiently large (about 15 inches from top to bottom) that I had to print it in two parts, running out of filament half-way through printing part two.

No matter; everything's getting painted anyway.

Step two is getting the basic structure of the wall it's going on set up. I got a suitably sized piece of thin plywood and sketched out where I wanted the window to appear.

Then I started cutting up some sheets of foam to fit. The window frame made a good template to cut through the foam down do the wood.


With the basic shape set up, laying down the strip of LEDs was next, turning back and forth within the window space. The strip actually starts at the bottom corner so that it can be plugged in.


They were bright enough that they shone through the unfinished foam. While it's all getting painted, I covered the section of LEDs from the edge to the window with a strip of foil before gluing it all down with foam glue.


Next came roughing out the pattern of blocks. Like that video linked above suggests, it's a good idea to do that in advance with a little thought rather than freehand it. I also cut out a frame and a few other bits to become "stone."


This is the messy part: cutting grooves. I used a Dremel with a wire brush attachment. Absolutely marvelous for cutting through foam sheets, but incredibly messy.


On to painting. This is after a pass of a light brown base coat, a little sienna on the lower edges of the "blocks," and a little green on the upper edges.


Followed that up with a somewhat diluted light gray and a wash of very dark gray to fill in the cracks. I found, as I often do, that my washes end up everywhere, not just where they're supposed to settle in, and there were several passes of wiping down the elevated parts and doing more passes of lighter colors where the wash bled in too much.


With that out of the way, it's time to mess with the lighting a little. A few sheets of a translucent but not entirely transparent plastic serve to soften the points of LED light.

(I experimented with a stained glass pattern behind the window, printing out a colored design on transparency paper. Unfortunately, the plastic simply refused to keep the ink and despite repeated attempts and overnight dryings, it would smear at the slightest touch.)

One of the nice things about foam is that it's really lightweight. The frame was secured with foam glue and some pins. To get the printed frame on, I glued some heavy-duty staples to the underside and pressed it in.


This fit very snugly against the cabinet end, but it's not done yet. I left the top and bottom edges clear so I could drill through the foam and backing and screw the "stone" wall securely to the underlying cabinet face.

...and then pin top and bottom pieces to cover the unpainted sections.


Plug in, and turn on the light.


Or, to get fancy, set the LEDs to change colors.


So now my office labyrinth is accompanied by a Gothic window.


Tuesday, September 14, 2021

Night at the Cathedral

So I had a thought about a fun little 3d printing project. I picked up a few cheap night lights when I was at the hardware store, then after a little measuring got a Gothic-style window design off of Thingiverse, bent it into a semicircle, added a base so that it would fit onto the light the way the original transparent cover did, and then did a little stone texturing after printing it out. With a "lead" grid draw onto a clear plastic strip, it doesn't look half bad.

And when the light comes on, it continues to look right.

Pretty happy with this, at least as a small project. May try something more ambitious with a more elaborate rose window.


Tuesday, April 21, 2020

Where We Keep All The Books

Like libraries? Yeah, we all like libraries. All of us who would read this, anyway. A good old-school library with old books and wood and plush leather furniture, like the private library at the Biltmore estate, the Morrison reading room at UC Berkeley, or Zatanna's libraryat Shadowcrest.

So last month, I built a Star Wars-themed book nook. Much fun, looks nifty on the shelf, but a bit wide and clumsily constructed in places. I learn a bunch and set out on another project. This one was far more complicated, but I think better thought out.


The library is made from three identically structured bays, boxes about three by four by nine inches cut on the CNC machine, with arch-shaped cutouts on two facing long sides, box-joint edges, and a few holes here and there for various reasons.
 

The platforms for the "balconies" are CNC'd as well, but most of the rest of the furnishings are are 3d printed. The bookshelves are from a modular bookshelf design on Thingiverse. I flipped a few of the shelf designs horizontally, so the arrangements of volumes are even more different than in the original design, and every single spine and scroll is individually painted.


 And there were a few other printed bits: the spiral staircase, the railings, the fireplace, and the table. The floors are images of Persian rugs printed on matte photo paper.


After assembling each bay, I ran a long string of LED lights behind the walls, poking bulbs through pre-drilled holes. 


I had hoped to make an infinite library, but that didn't work out. I've done infinity mirrors before, and the principle is simple: mirror in back, semi-mirrored window film in front, lights in between. The problem is that you need a lot of light, and I wasn't generating enough. Still, putting a mirror in the back makes it look twice as deep as it actually is, which isn't bad.


The hardest part is, of course, finding enough room on the shelves to put it.


Now all I need to do is find this much real shelf space.

Friday, March 6, 2020

Witness The Power Of This Fully Operational Bookshelf

Not long ago, certain persons to whom I am married introduced me to the idea of book nook inserts, basically little dioramas scaled for bookshelves. While they take up valuable space on what are surely crowded shelves, they are quite nifty. So I thought I'd give it a shot.

I had a number of ideas, but the first one was something Death Star-like. Naturally, it was 3d printing to the rescue. The parts are mostly from a Death Star diorama set and and a bunch of Death Star surface tiles from this guy. Print, prime a uniform gray, add on a few accents here and there, finish with a thin, dark wash, and glue to the inside of an improvised box. I added some LED lights (mostly shining through custom drilled holes) and a landing platform for a TIE fighter.


For a first attempt, I think it went tolerably well. It's wider than I'd like (wasn't really sure how it would come out, but I can use this as a gauge for how much narrower to make it), but it does give the impression of Death Star-ness. And I have ideas for more...


Saturday, September 8, 2018

More Panic

Our custom-built Castle Panic set keeps getting more elaborate. Right now, it looks something like this:


We've added some external accessories to the set, like the printed "treasure chest" which contains all of the fire markers (flat cardboard for monsters, 3d printed for architecture) and a couple of new cards (new fronts pasted onto cards from worn-out old decks) like the squire here (any color, hits in castle ring).

Lately, though, I've been doing stuff with the monster pieces lately, mostly the big monsters from the Wizard's Tower add-on. I've been reading up on miniature painting techniques, and I've been applying the base-wash-drybrush process to some newly printed pieces, which I believe are all designs by the indispensable Miguel Zavala, glued onto custom bases, which I think I need to upload to Thingiverse. I've also been experimenting with printer settings to give me better-looking minis. The idea, which I got from 3d Printed Tabletop, is slow printing, small layers, high infill. I'm getting it to work well, but these are early attempts which, I think, don't look great as minis on their own. Notably, the layer height I used for this run wasn't a great for the printer I'm using, resulting in a very striated print. I'm getting better prints with some slightly different settings, but ironically I think the more stratified print paints better. It takes the wash better than my smoother prints, so I'm not sure whether or not I'll replace them with "better" prints. Here's what we've got:


That's the hydra.


That's the chimera. I'm pretty happy with the paint job, given the small scale and my very unsteady hand.


And the dragon. This replaces another one which wasn't as good a model, but Alex liked a more colorful paint job it had. Can't blame him, and I might reprint/repaint for that.


And finally, there's Agranok from the Dark Titan expansion. I was fortunate enough to find a mini which closely resembles Agranok (I just left the wings off the pit fiend), but there was an issue with the base. The Aggie's double-sided base is great for a cardboard counter, but not good for a 3d figure. So I modified a HeroClix-compatible base and put a little paper insert in it so we can rotate the base to indicate how many HP he has left.

Sunday, March 4, 2018

3d Printing Basics

For some time, I've been noodling with a post about what I think it's important to know about 3d printing. Basically, what I would like to have known when I started doing it. And here it is. 

Making and Modifying Models

3d printing starts long before the printing. It starts with the design of a 3d model, just as regular, on-paper printing starts with creating a document or image. There are many CAD tools which can be used to produce such models. In the past year or two, the free tools I've used in the past have moved to on-line applications rather than downloadable local ones, including Sketchup and Tinkercad. For something more heavyweight, there's Blender, which I've tried to use to little avail. The standard file format for use in 3d printing is STL (stands for stereolithography, which ironically is a completely different method of 3d fabrication than what most home 3d printers use).


Of course, you don't have to start from scratch. You don't even have to do any design work at all. There are plenty of places where you can download ready-to-print designs. I usually frequent Thingiverse and Youmagine. Designs downloaded form there can be sent to a printer without any modification on your end, or they can be used as the basis of your own designs.

CAD vs. CAM

STL files define a shape but are agnostic about how what you do with it (for example, the same tools you use to build 3d printable designs are also used for architectural modeling and creating items for 3d animation and games), so after the CAD stage of design (computer assisted design), there's the CAM stage (computer assisted machining). There are stand-alone pieces of software which do various parts of this task, but they're typically bundled with the same software used to control the printer. Cura and Repetier are excellent free tools for the job.

In preparation for printing, the shape is analyzed and a series of instructions designed for a specific tool are generated to physically produce it. This is sometimes called "slicing," since one of main operations is to cut the model horizontally into a series of two-dimensional slices. For example, a pyramid is approximately a series of successively smaller squares set atop one another. Most software allows you to change the settings for how your model is sliced and what other instructions are sent to the printer. Important settings include:
  • Temperature. Your hot end (the heating element which melts the filament so that it can be extruded) has to be hot enough to get the plastic soft and flowing, but not so hot as to burn it. Different filaments work in different temperature ranges, and even within recommended temperature ranges, there can be better temperatures for specific brands and hot end designs.
  • Thickness of layers. This determines the resolution of the printed piece in the 3rd dimension. For example, when printing out that pyramid, a 3d printer has to print out layers of finite height, so it can't do an unbroken slope, but it can print out a series of shorter or taller steps. The thinner the layer, or the shorter the step, the more closely it approximates that slope. Small values, measured in hundredths of mm, will give you very nice resolution, but take correspondingly longer.
  • Shell thickness. This may be divided into top, bottom, and side thickness.
  • Fill density. 3d printed items are usually not solid plastic. Rather, they've got an internal grid providing enough substance to hold together.
After some experimentation, I've found some default settings which I use nearly all the time. I print with PLA filament most of the time, which uses relatively low temperatures, so my hot end is usually set around 190-200C, with a layer height of 0.1mm (down to 0.05 mm if I want really high quality, up to 0.15 or even 0.2 if I'm OK with fast but coarse, or if the piece has very little detail and thick layers won't matter much), and 20-25% fill. Shell thickness on the sides is a function of the diameter of the printer's nozzle. That is, if you've got a 0.4mm nozzle, your shell thickness has to be in whole-number multiples of 0.4mm. A double-thick shell (say, 0.8mm with an 0.4mm nozzle) is usually pretty good, with top and bottom to match.

This process (CAM/slicing) generates a set of instructions telling your printer what temperature to heat up to, where to go, when to extrude filament and when to stop, and so forth, based on the design and other settings. These instructions are in a language called gcode. Those commands may look something like this:

G1 F1200 X180.564 Y50.739 E26.57755
G0 F4200 X181.130 Y50.739
G1 F1200 X181.759 Y51.369 E26.62196
G0 F4200 X181.759 Y50.803
G1 F1200 X181.696 Y50.739 E26.62644
G1 F1800 E25.62644
G0 F4200 X141.759 Y50.966
G1 F1800 E26.62644
G1 F1200 X141.533 Y50.740 E26.64239
G0 F4200 X140.967 Y50.740
G1 F1200 X141.759 Y51.532 E26.69827

However, you don't actually have to know anything about gcode to do 3d printing. The software handles it all for you, just as your printer drivers handle encoding data to send to your printer without you needing to understand the language in which it handles that conversation.

The Printer and Printing

At last, we look at the hardware itself. Most home and hobbyist printers do FDM (filament deposition model), which uses a plastic filament as its raw material (there's also DLP and SLA printing, which use a tank of photosensitive resin and various methods of exposing them to UV; these printers tend to be faster and more detailed, but the process is vastly more expensive). You'll almost always find filament in 1 kg spools at with a diameter of 1.75mm or 3mm. Be sure to get the right size for your printer!


This filament is drawn through an extruder at a metered rate. A heating element in the extruder assembly heats the filament to a semi-liquid state, and it's forced through a nozzle onto a print bed.


I have no recommendations for specific models of printer. That landscape changes too quickly. But I do have some recommendations on what to avoid, what to get, and what to consider.

Things to be wary of include:
  • Cheap kits. It's possible to get a very inexpensive DIY printer on Amazon and other retail outlets. They're not necessarily bad, but they do tend to be made by no-name overseas manufacturers. Some are perfectly good, but instructions may be incomplete or poorly translated, and if you've got a bad part, customer support may be weeks away. That may be tolerable for a second printer, when you've got a good idea of how and why things work and can potentially source replacement parts yourself, but it's a really good idea to go brand name for your first.
  • Proprietary filament. Some manufacturers follow the inkjet printer model: sell you an inexpensive printer and make it back on the printing medium. The printer won't work with third-party filament. Instead, you have to use cartridges they sell at a substantial markup over "open source" filament.
Things to get:
  • A heated bed. A common problem with 3d printing is bowing or curling. As the first few layers of filament cool, they shrink and peel away from the print bed, resulting in a print with a curved bottom. There are a variety of dodges around that, but by far the most effective is a heated bed. If the print bed maintains a temperature around 50-60C, those bottom layers don't cool to the point of shrinkage. Curling vanishes. No matter what it costs in addition to a basic model of printer, you'll more than make it back in savings on ruined prints.
  • Accessories. There are a few consumables and other bits and pieces you'll need for good printing. You want kapton tape, for example. This is a plastic which stands up to high temperatures well. A layer of this tape provides a protective layer to your print bed, preventing gouges when you have to chisel off prints which are really stuck on, as happens some times. You'll also want an offset spatula, bench scraper, or similar thin metal item to do exactly that. Finally, you'll want some material to help prints stick to the print bed. Exactly what you need depends on the material you're using. If you're using PLA (see below for more discussion of filament materials), that's cheap hairspray. I use AquaNet or its generic equivalent. If you use ABS, probably the second most common filament, you need a bit of a slurry of acetone and some ABS dissolved in it. Nylon wants a porous surface like paper or cardboard. Check manufacturer's recommendations. And it can't hurt to have a few craft basics like an Xacto knife and fine sandpaper and the kinds of drivers, wrenches, and other tools you'd use on a computer.
Things to consider:
  • Temperature range. A basic FDM printer can at least get up to the low 200s C, which is good enough to print in PLA. PLA, which is short for "polylactic acid," is the cheapest and most common 3d printing filament. It's a plastic made from corn. It's nontoxic and biodegradable and it's perfectly good for miniatures, game pieces, art pieces, and the like. It is not, however, either particularly durable or flexible, so it's not great for a good many practical applications. ABS, or acrylonitrile butadiene styrene, is what Legos are made out of. It's a much stronger, but it puts off an unpleasant odor when printing (so you don't want to be around), wants a heated bed (above) and higher temperatures, starting around 230C, if not hotter. And there are a variety of also-rans (nylons, polycarbonates, etc.) which print as hot as or hotter than ABS. Something that goes up to 230 is certainly good enough for PLA and maybe ABS. Up to 250 is good for ABS and potentially some other exotics, and something that goes up to, say, 280 can print in pretty much anything. If you're just want a starter printer, you don't need a seriously hot hot end, but if you're going into it knowing that you'll want to work in industrial-grade materials, then higher temperatures are a must.
  • Extra nozzles. The nozzle on your printer can and eventually will get clogged up and need to be replaced, so it's a good idea to start out by getting one or two extra for when you need it. What's optional is buying nozzles in different sizes. Most printers come with a nozzle with a diameter of around half a millimeter. That's essentially the size of the "line" it draws when it prints. A different nozzle, then, effectively changes the "resolution" at which the printer prints. For very fine work, you may want to use an 0.3mm or 0.2mm nozzle (I've worked with nozzles as small as 0.1mm, but it was painful to work with), while for large pieces, a larger nozzle can get the job done faster (I printed parts for what was ultimately an 18" tall sculpture with a 1mm nozzle and it came out just fine).
  • Print volume. This is one of those "get what you pay for" things. Smaller printers are cheap, and bigger printers are more expensive.

Friday, September 8, 2017

Her Own Private Themyscira

When the recent Wonder Woman movie came out, just about every woman I know wanted to go to Themyscira right now (except my mom, who doesn't go in for movies), and I suspect a good many of them would have wanted to stay. But, of course, it's difficult to get plane tickets to places that don't exist, so none of them got to make the trip.


But I got to thinking about how I could get my lovely and talented spouse as close to Themyscira as I could. The answer was a 3d-printed frame. It was back to the Classical architecture of my grad school days: fluted Doric columns, a simple entabulature (those are Ws instead of triglyphs, of course), and so on. Finished, of course, with a little paint to give it an aged look and some terra-cotta-colored "roof tiles."


 From behind, it's hollow.


And there are cutouts on the top and right side.


They're sized to snugly fit a small digital picture frame while leaving the ports and controls open.


It contains a memory card with screen shots from the movie as well spots on the Amalfi coast on which the movie Themyscira was based. The result:


A slideshow providing a window to the island of the Amazons. It's not a one-way ticket to a mysterious island, but it does fit nicely on a table or desk. And certain persons to whom I am married seem to like it.

And it just now occurs to me that I could do the same thing for her on a Rivendell theme...


Sunday, October 16, 2016

Still more surfaces

I downloaded a design for a hall and tower atop a hill from Thingiverse, which unfortunately I can't find now to link to. It's a pity, since I can't illustrate how it's printed as a single piece, but it doesn't look like that in the painted version.


So, then: masked the base and roof, primed the rest and hit it with stone-textured paint. Painted the "rock" with moss-texture paints, filled the base with sparkly blue ink, and did the top with aged copper. The castle is hollow and sized quite comfortably for a battery-powered tea light.

And I'm acquiring quite the collection of nifty little experiments which I have nowhere to put and no clear thing to do with them. I don't have room for all this stuff!


Sunday, September 18, 2016

The Burning Bed

...well, a bit warmish, anyway.

A persistent problem in 3d printing is warping, bowing, and curling. The first printed layers in a 3d printed item cool down sooner than the upper layers and shrink, pulling of the print bed and curling up. I've tried all the usual remedies: a combination of painter's tape and hairspray on the print bed to keep everything stuck down, printing with rafts and brims added by the printing software, and so on. And they never really worked out. Here's a typical example:


This is one of the walls from my beloved DIY Castle Panic set. It's lovely, but the bottom curls significantly. The wall portion is about 21mm thick in the middle, but around 19mm at the ends, leading it to rock and spin easily when placed on the board. And that's over a length of under 7cm.

Here it is compared with something I just printed out, the base for a dice tower.


I'd post some kind of comparison of how much it curls over that distance, but here's the thing: it doesn't. There's no notable curve over its 18cm longest dimension. The difference is in the hardware. I finally bit the bullet and got a heated bed for my Printrbot. While it took some work to get all the right settings dialed in (some fiddling to get the self-leveling bed recalibrated, bed temperature to 50C, a layer of glue stick on the kapton tape, and no brims or rafts; they just waste time and filament now), and it's not technically necessary for the PLA filament I usually use, the difference is quite stunning. Indeed, I'd basically recommend that anyone getting into 3d printing spring for the heated bed up front. It makes one of the most annoying problems in 3d printing go away instantly.

Thursday, February 18, 2016

Sweet Dreams

A friend of my lovely and talented spouse is getting into cosplay. One of the things she's been working on is Peggy Carter. And given the opportunity to wear a fabulous red hat and totally punch a dude out with a stapler, who can blame her?

It happens that the shade of lipstick Peggy uses is commercially available. It also happens that one of the gadgets Peggy uses from time to time is a knockout agent disguised as lipstick:


You see where this is going, right? My lovely and talented spouse saw that someone had 3d-printed a "102 Sweet Dreams" case and thought that would be a suitable accessory. I agreed and ordered a tube of the right lipstick so I could properly measure a case for it.

I ended up making the case out of a whole bunch of pieces. There are the upper and lower halves of the case, of course (printed open end up to save a lot of time and support material), but I decided to print the cap-like ends as separate pieces for a smoother appearance. Likewise, to get a maximally good appearance for the name plate, I printed that as a separate bit and attached it rather than having that imprinted into the side of the printed design.


So, works pretty well. The bottom is snug enough to hold the original lipstick without having to shove it in, and it comes out reasonably easy for replacement.