I recently became aware of some exotic new materials for 3d printing. Notably, I've come across some materials by colorFabb. They're playing with a number of unusual things, but the ones I'm dealing with right now are their copper and bronze filaments. These aren't just colored. They're PLA filament with a substantial addition of copper and bronze powders. The ideas is that with appropriate treatment, they look for-real metallic. So how do they work?
They print quite well in my quick tests, sticking to the usual blue-tape-and-hairspray surface I usually use as well as any PLA with no noticeable warping. The marketing material indicates that the metal content means that they cool faster than regular filament, so they're particularly good for pieces with overhangs. I haven't done anything with exaggerated overhanging material yet, but it at least sounds plausible.
The printed material seems a bit fragile. It doesn't fall apart if you breathe on it wrong, but it does break more readily than 100% PLA. But the big difference I noticed was the weight. Not surprisingly, the metal-bearing filament is a lot heavier. It's not as heavy as an all-metal item would be, but there's definitely some heft. It also feels a bit cool to the touch, a bit like something metallic would.
However, they don't come out looking like metal. The bronze comes out as a sort of sandy light yellowish brown while the copper comes out a red which is definitely in the copper color range, but neither appears metallic.
That's where the post-processing comes in. The first step is to sand the surface of the print smooth, optionally hit it lightly with a little black paint to create the illusion of a dark patina, and finally rub with a brass polish.
(That bit on the right is a late Warring States-era dagger axe, the first in a series of historically accurate polearm hair sticks I'm making for Stephanie.)
So far, it's coming out OK, but not great. I'm getting a definite metallic sheen, which is definitely understated in the photo but still not all that impressive. Clearly, I need a better sanding and buffing technique. I've seen a Dremel used with some buffing heads, but in my tests, I've been gouging the plastic pretty badly with it. However, the steel wool I'm using isn't getting outstanding results. Finely detailed pieces are also a problem. I'm having a difficult time with all the corners and little protrusions. I gave up on the retro spaceship from the first picture and printed a little sword in the copper to see if that would work better. There is one interesting thing, though: within a few minutes, the bronze head on the dagger axe was already developing a pale green patina. So, yeah, actual metal.
That's nifty, but there's one other notable thing about this filament. It's expensive. It's really expensive. It costs significantly more by weight than regular PLA, and it's much denser, so the same weight gets you a fraction as much length. All told, it's more than an order of magnitude costlier than plain PLA on a meter-by-meter basis. So it's neat for specific artistic effects, but run test prints with cheaper stuff first to make sure they're absolutely perfect. Mistakes with the metal-bearing filament are costly.
A desperate attempt to control the look of our everyday environment with precious little artistic creativity and no relevant skills.
Thursday, March 5, 2015
Wednesday, February 18, 2015
A Tale of Two Hexes
As a long-time gamer, I've played and continue to be involved in games which use hex maps, going back to Squad Leader and other Avalon Hill products. One of the earliest such games I played with the Metagaming/Steve Jackson classic Ogre, for which I've already done a bit of printyness. Having 3d cybertanks ready to roll is great, but what about the other units? The internet being what it is, somebody's already way ahead of me. The units are great, but can I add anything to that? Nifty as they look, they're missing something important for actual game play: stats. But that's easily dealt with. Whip up a hexagon of the appropriate size, extrude it into a suitable thickness, add a little 3d text around the edges, and drop the unit miniature in the middle.
One of the other games I'm into is the likewise Steve Jacksony RPG GURPS, which likewise uses a hex grid to regulate movement. Here, again, the internet's got my back, with these lovely floor tiles which could be used to build nice dungeons. All I have to do is to add some hexes, as in this test piece.
The problem here, though, is one which has plagued gaming map-makers for decades. People tend to build in rectangles, but maps are in hexes. The source tiles I'm working with are naturally in various sizes of squares and rectangles, and while I can lay down a hex grid of whatever kind I want on top of a batch of tiles, I have to decide between making either a geomorphic hex grid which doesn't make sensibly shaped rooms or a geomorphic square grid which ends up with a bunch of not-quite-hex-shapes around edges. Oh, well.
One of the other games I'm into is the likewise Steve Jacksony RPG GURPS, which likewise uses a hex grid to regulate movement. Here, again, the internet's got my back, with these lovely floor tiles which could be used to build nice dungeons. All I have to do is to add some hexes, as in this test piece.
The problem here, though, is one which has plagued gaming map-makers for decades. People tend to build in rectangles, but maps are in hexes. The source tiles I'm working with are naturally in various sizes of squares and rectangles, and while I can lay down a hex grid of whatever kind I want on top of a batch of tiles, I have to decide between making either a geomorphic hex grid which doesn't make sensibly shaped rooms or a geomorphic square grid which ends up with a bunch of not-quite-hex-shapes around edges. Oh, well.
Monday, February 9, 2015
The Factory States
So what is my robot printing?
Well, a guy over on the SJ Games forums had an idea about printing out the 3d Ogre standup sheets, created as part of the Ogre Kickstarter campaign, on clear plastic, producing clear Ogres where you only see the design, not the material it's printed on. I thought that was rather clever, and then realized that if I could extract the shapes from the graphics in the PDF, I could print out the shapes and assemble my own plastic Ogres. I got to the point of having .stl files ready to print:
And then I thought, "Hang on. I'm dealing with a 3d printer. Why am I messing around with 2d objects?" The goal became designing and printing a full 3d Ogre.
Design was largely an exercise in figuring out how to use Sketchup and what plugins I wanted to add in. Starting with some of the pieces in the "2.5d" design, there was a lot of use of the extrusion and scaling tools, and it all became much easier when I found a plugin that made geometric solids.
So far, so good. But printing was a problem. When I converted the design to gcode, Slic3r dropped significant parts. The conning tower, for example, simply vanished:
Why was it doing this? I had no idea. But on a hunch, I switched to different software for slicing and printing. Cura seemed to treat the design more as it was intended:
That looked more promising, so I sent it to the printer. And this is what I got:
This Mk. IV is about three inches long. I note that features smaller than about a half-millimeter may as well not be there. I may play with this a bit and add a few more surface features like some tread texture. I also want the conning tower to be a bit different in various ways, and the front part should have steeper angles. And at some point, I should build a Mk. V.
Monday, February 2, 2015
Instant Stencil
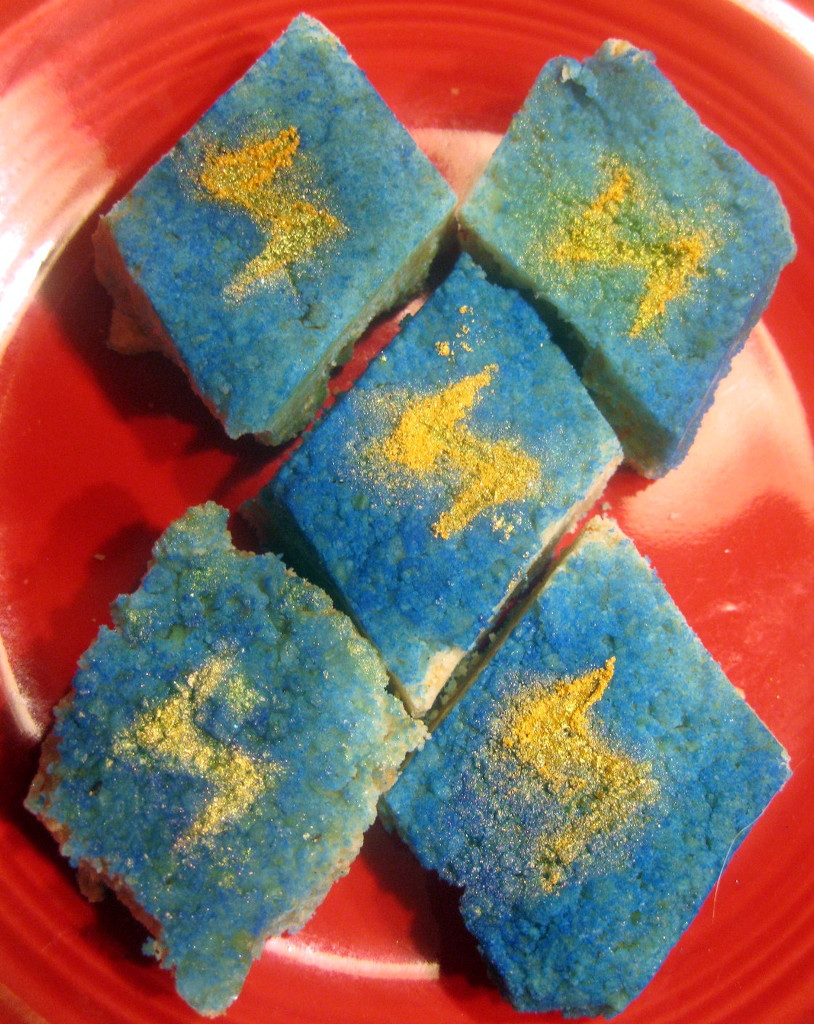
The 3d printer continues to subtly transform the way we do things around here. Here's the latest example: certain people I'm married to needed to paint a superhero logo (Ms. Marvel's, to be precise) on a dozen or so small confections (kaju katli; yum). We already had the can of (edible) gold spray paint and a container of (equally edible) gold dust, but we also needed a stencil. It's certainly possible to do that with, say, paper or cardboard, but there are problems. Regular paper? Easily soaked through after a use or two, and at any rate floppy. Cardboard? Still a limited number of uses, one has to find the right kind of material (which means digging around for...well, you're not really quite sure what), and there's an inverse relationship between ease of working and durability, so even with some reasonably good material I'd probably have to cut two or three.
Enter the printer. The PLA is non-toxic, and it's easy to make the design. I fired up Sketchup, drew a square about the size of one of the pieces of kaju katli, used the pencil tool to draw the symbol (a stylized lightning bolt) on the square, deleted the lightning bolt space from the middle of the square, used the rectangle tool to add on a small handle, extruded it to a thickness of about 2mm, and exported the STL for printing.
Maybe two minutes to build the model, about that long to print, and we're ready to roll.
In the event, it didn't work out all that well. The rough surface of the kaju katli meant there were leaks around the edges. But it wasn't any worse than if we'd used a paper one!
Sunday, January 25, 2015
Office Space
For reasons which can be summed up as "corporate reorganization," I suddenly acquired the need to be able to work from home full time with multiple computers. We've had space in the semi-finished attic which we had hoped to turn into a home office, but it's the most remote part of the attic, and it's packed solid with boxes, so that's not likely to happen any time soon, so I have to work with the space I've got.
The most accessible space we have at the moment is the vaguely retro-styled lounge, furnished in part with a few vintage mid-century pieces I inherited from my grandmother. A typical desk in that room would both take up more space than I'd like and clash horribly with the rest of the room (and would doubtless cost significantly more than the solution I ended up with). What to do?
Well, if you look over here at one of the record players, you'll see a panel of pin-ups behind it (reproductions salvaged from some recent calendars and pasted onto a panel).
Rolling the record player out of the way, the pin-ups and a couple of fold-out panels are hinged to a frame holding everything to the wall.
The lower panels fold out as supports for the fold-down panel of pin-ups, which in turn...
...folds out into a 6' x 2' workspace, using piano hinges in grooves sunk into the panels with the router. I still need to run some cables and improve the lighting, which I'll be doing over the next few days. Some day, I'd like to surface the desk better, but since I'll be WFH full-time starting in a week, that's not an option these days.
Tuesday, January 13, 2015
In Which Stereolithography Reverses The Polarity Of Graduate Studies
Back when I was in grad school, I did a little work in support of an ongoing project in Epirus by helping to digitize a map. There was a large-scale contour map of a region being surveyed, which was taped down on a special digitizing table. Other grad students and I would come in now and again and spend some time clicking around the contours with a specialized mouse, slowly reproducing the printed lines on the map in a digital format.
I recently came across a web-based utility called Terrain2STL. The Google Maps interface lets you pick a square of terrain anywhere on the planet (3 to 27 arc-seconds on a side; in the interface, it looks more like a rectangle because of the map projection). The utility uses the topographical information underlying the selected block to automatically generate a .stl file, suitable for use with a 3d printer or CNC mill. Indeed, it was trivial to make this:
That's not in Epirus, mind you. It's here:
(Photo yoinked from here)
It's Mt. Athos, the sacred mountain on the other side of the country, and home to a whole bunch of monasteries where women aren't allowed (so it was fitting, I think, that my lovely and talented spouse take the picture while holding it). The point is, though, that in this day and age, stuff I did in grad school can run backwards. Instead of taking a physical object and turning it into data as I did, someone could get the data and run off an object, perhaps sticking pins in it to indicate sites for further investigation or drilling holes to indicate where there's been looting. And if I could remember just where in Epirus that map was, I could do it myself. Oh, brave new world that has such widgets in it.
I recently came across a web-based utility called Terrain2STL. The Google Maps interface lets you pick a square of terrain anywhere on the planet (3 to 27 arc-seconds on a side; in the interface, it looks more like a rectangle because of the map projection). The utility uses the topographical information underlying the selected block to automatically generate a .stl file, suitable for use with a 3d printer or CNC mill. Indeed, it was trivial to make this:
That's not in Epirus, mind you. It's here:
(Photo yoinked from here)
It's Mt. Athos, the sacred mountain on the other side of the country, and home to a whole bunch of monasteries where women aren't allowed (so it was fitting, I think, that my lovely and talented spouse take the picture while holding it). The point is, though, that in this day and age, stuff I did in grad school can run backwards. Instead of taking a physical object and turning it into data as I did, someone could get the data and run off an object, perhaps sticking pins in it to indicate sites for further investigation or drilling holes to indicate where there's been looting. And if I could remember just where in Epirus that map was, I could do it myself. Oh, brave new world that has such widgets in it.
Sunday, January 4, 2015
Phone Case, Mk. I
We got the kid an inexpensive cell phone for Christmas. Printable cell phone cases are a dime a dozen on 3d printable sites, but pretty much only for iPhones and Galaxies, so if I want to print a case, I have to design it myself.
It was harder than I expected. Finding the basic dimensions was easy, getting the precise locations of all the buttons and ports and such a bit more difficult (it involved wrangling a rigid ruler held up against slightly curved surfaces), and getting Sketchup to play along was remarkably difficult.
I started by drawing a basic rectangle. My plan was to poke some holes in it, use the offset tool to expand the area by the desired thickness of the sides, and the push/pull tool to raise the base and edges by suitable heights.
The biggest problem is that, once I made the desired "cuts" in the base, using the push/pull tool would raise or lower the face and leave walls outlining the cut-out for the camera and the name, but didn't extrude it into a solid. I had to copy the base, raise the existing copy to the desired thickness, and then paste a copy of it back at the original height to close up the solid. I also couldn't figure out how to cut holes through the raised sides, so the cuts go all the way up. Here's what I ended up with:
The printing took forever, but it worked fairly well:
If/when I do this again, I'll probably take a different approach. I'll probably do something similar with the base, but for the sides, I'll design slabs of the appropriate dimensions for each side, poke holes as appropriate, and rotate them 90 degrees to use as sides.
Oh, and ideally I'd use Ninjaflex or some similar flexible plastic rather than relatively brittle PLA.
It was harder than I expected. Finding the basic dimensions was easy, getting the precise locations of all the buttons and ports and such a bit more difficult (it involved wrangling a rigid ruler held up against slightly curved surfaces), and getting Sketchup to play along was remarkably difficult.
I started by drawing a basic rectangle. My plan was to poke some holes in it, use the offset tool to expand the area by the desired thickness of the sides, and the push/pull tool to raise the base and edges by suitable heights.
The biggest problem is that, once I made the desired "cuts" in the base, using the push/pull tool would raise or lower the face and leave walls outlining the cut-out for the camera and the name, but didn't extrude it into a solid. I had to copy the base, raise the existing copy to the desired thickness, and then paste a copy of it back at the original height to close up the solid. I also couldn't figure out how to cut holes through the raised sides, so the cuts go all the way up. Here's what I ended up with:
The printing took forever, but it worked fairly well:
If/when I do this again, I'll probably take a different approach. I'll probably do something similar with the base, but for the sides, I'll design slabs of the appropriate dimensions for each side, poke holes as appropriate, and rotate them 90 degrees to use as sides.
Oh, and ideally I'd use Ninjaflex or some similar flexible plastic rather than relatively brittle PLA.
Subscribe to:
Posts (Atom)