A series of arty projects has gotten me here:
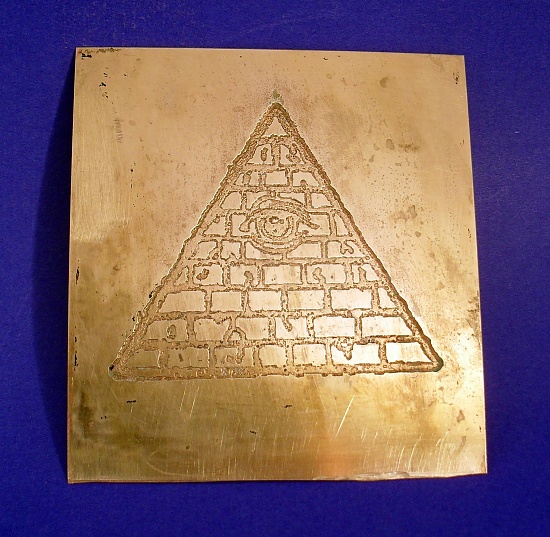
This is an etching on a thin sheet of brass
done almost entirely with things found around the house. I adapted the
basic technique from
some pages at the terribly interesting Steampunk Workshop.
The
metal is 0.015" brass I got at the local hobby supply store. It had no
protective coatings requiring special cleaning, so it was pretty much
ready to use out of the box. My first experiments were with even thinner
metal, essentially thick brass foil. OK for some proof of concept, but
not nearly durable enough to stand up to any punishment. First important
lesson: use metal you can't easily bend with two fingers.
A few
minutes work with any good image manipulation program can turn just
about any black-and-white image (or any image which looks OK converted
into black and white; but it has to be B&W,
not greyscale) into something suitable for ironing onto the work
piece. Because I only wanted etching on the front, I covered the back
with packing tape. A coat of spray polyurethane would have worked just
as well, but might have been annoying to scrape off down the line if I
decided to etch the other side. The weird part here is that when I got
the paper peeled and rubbed off of the toner, the residue turned white
when it dried. Still, it stuck to the metal admirably. (Oh, second
important lesson:
glossy injket paper through a
laser printer. Regular paper doesn't work.)
An
old laptop power adapter provided the power source. The plug for the
computer end had become uselessly frayed. I simply cut it off and
stripped the cable down to separate the positive and negative wires. The
inner wire attaches to the work piece, the outer wire to something that
sticks into the etching solution.
Speaking of which, I used salt
water for the etching solution rather than more expensive, more toxic,
and more not-in-my-house-that-day copper sulphate. The size and shape of
the piece allowed me to use a gallon milk jug with the top cut off.
Once it went in the saline and the power was plugged in, it started
bubbling away, and the solution became tinged noticeably blue after an
hour or so. Third important lesson: it takes a long time to etch. This
piece took about eight hours. Fortunately, I'm in no hurry.
After
drying it off, I tried a number of things to clean off the corroded
bits of exposed brass and the toner. The wire brush attachment on my
Dremmel tool was marvelous, but it pretty much destroyed the brush.
Sandpaper...just don't. The winner is, as the Steampunk Workshop
suggests, steel wool and a lot of vigorous scrubbing.