Wednesday, December 28, 2016

Friends, Romans, Countrymen

Last year, I used the CNC machine to build a knife block with an engraved marble face. And that was cool and all, but how to top that? I'd wanted to make a bust-of-Caesar knife block, but that didn't work out. But two things changed. First, I got the heated bed, which in turn gave me a larger print volume. Second, I found a bust of Caesar.

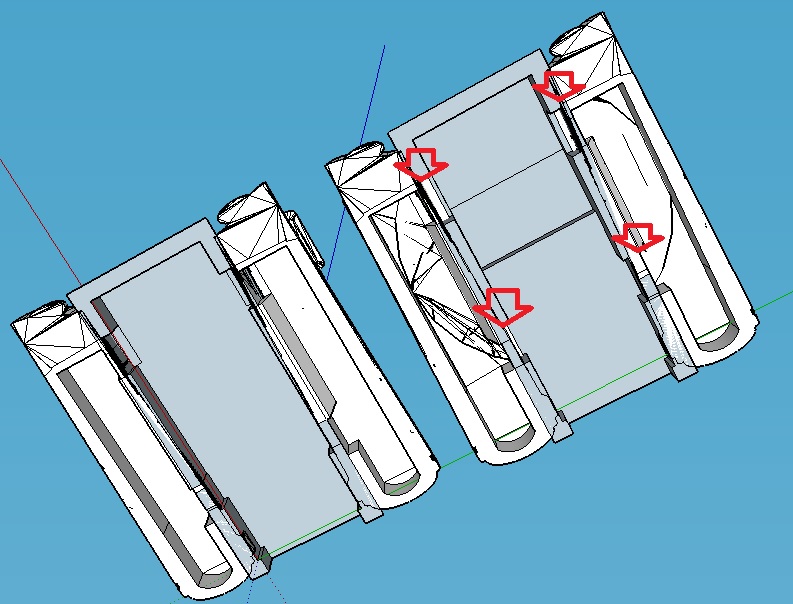
Design-wise, this was fairly easy, though I had to run it through a variety of tools to make it work. I started with 123D Design to scale it up to as big a footprint as my printer could handle, about 6" x 10", corresponding to a height of about 15". Then I did some boolean operations to "carve out" slots for the knives. Once I'd gotten the shape together, it was off to netfabb Basic to chop it into parts no taller than six inches. Alas, netfabb Basic is no longer available for download; happy I got it when I could.

And then it was off to the printing. I usually use a 0.4 mm nozzle. That's fine for the trinkets and game pieces I usually print, balancing fine detail with print speed. However, for this, I went with a full 1 mm nozzle. I didn't need nearly as much detail on a 15" bust as I would on, say, a 25mm orc figurine I'm printing for the Castle Panic set, and I didn't need it taking forever. As it was, the four pieces of the knife block/bust took five to six days of solid printing time, even at a rather low infill percentage and tweaked in various ways to minimize support material. Assembly took several hours but very little work time, sanding down some rough top surfaces and then giving the Gorilla Glue time to cure.

So, results:

 Not bad. Here's Caesar with a Chinese vegetable cleaver in his head.


Minus the cleaver, you can see the groove in his head. However, most of the knife slots are in back. It's big enough to hold four chef knives and four smaller ones; paring knives and such.


The join in the middle of the bust wasn't great; there was a bit of curling on of the pieces which even the heated bed didn't entirely prevent, or perhaps there were settings I could have changed. However, the others, like the neck here, worked very well indeed.

Sunday, November 6, 2016

A Question of Scale

So here's a neat thing you can do if you have multiple 3d making-stuff devices. I worked up a Wonder Woman logo based on the layered design they're using for the movies. Then I used it at one size as part of a pendant sort of thing printed on the 3d printer (the W itself is about an inch across) and another (almost exactly ten times as wide and tall, though only a millimeter deeper) for a carving job into some scrap plywood on the CNC machine.


The edges are a trifle rough, but it's remarkable how smooth the CNC's wood surface is. Almost feels sanded
.

Sunday, October 16, 2016

Still more surfaces

I downloaded a design for a hall and tower atop a hill from Thingiverse, which unfortunately I can't find now to link to. It's a pity, since I can't illustrate how it's printed as a single piece, but it doesn't look like that in the painted version.


So, then: masked the base and roof, primed the rest and hit it with stone-textured paint. Painted the "rock" with moss-texture paints, filled the base with sparkly blue ink, and did the top with aged copper. The castle is hollow and sized quite comfortably for a battery-powered tea light.

And I'm acquiring quite the collection of nifty little experiments which I have nowhere to put and no clear thing to do with them. I don't have room for all this stuff!


Monday, October 3, 2016

More Surfaces

I loved the rust paint I did the dragon with that I set off for the same manufacturer's copper/verdigris treatment. Also very, very nifty.


While I was at it, I did some stuff with various paints on some gaming scenery (an OpenForge gatehouse):


And a new dice tower:


It'd be fun to print out a bunch more of the OpenForge scenery for actual gaming use, but since my system of choice uses hexagons instead of squares, that might get a bit awkward.

Thursday, September 22, 2016

Iron Dragon

While getting some other things at a craft store, I came across a kit for providing an iron rust finish to any surface. Put on a layer of iron-bearing paint, then squirt on some kind of rapid oxidizer. I thought "Hey, I should print something out for this." And so I did. And this is what I got:


Not bad, I think. It's lightweight plastic, but I'm afraid to drop it on my foot.

The dragon-head door knocker I got off of Thingiverse was, in the event, really hard to treat. It's a very complicated shape, with lots of little nooks and crevices, and both the primer and the iron paint were quite thick, so it was difficult getting it completely covered. The "activator" sprays on, though, so that wasn't a problem.

There was also a problem with printing. The design is perfectly good, but my printer kicked out about an hour before finishing the job. I'm guessing a power fluctuation on our old wiring or something. Anyway, I was able to measure the height of the printed portion with the digital micrometer, fire up netfabb, slice off the unprinted section from the design, print that part off, and superglue it on. It went much better than I expected, and I can't find the seam even though I know exactly where it should be.

Sunday, September 18, 2016

The Burning Bed

...well, a bit warmish, anyway.

A persistent problem in 3d printing is warping, bowing, and curling. The first printed layers in a 3d printed item cool down sooner than the upper layers and shrink, pulling of the print bed and curling up. I've tried all the usual remedies: a combination of painter's tape and hairspray on the print bed to keep everything stuck down, printing with rafts and brims added by the printing software, and so on. And they never really worked out. Here's a typical example:


This is one of the walls from my beloved DIY Castle Panic set. It's lovely, but the bottom curls significantly. The wall portion is about 21mm thick in the middle, but around 19mm at the ends, leading it to rock and spin easily when placed on the board. And that's over a length of under 7cm.

Here it is compared with something I just printed out, the base for a dice tower.


I'd post some kind of comparison of how much it curls over that distance, but here's the thing: it doesn't. There's no notable curve over its 18cm longest dimension. The difference is in the hardware. I finally bit the bullet and got a heated bed for my Printrbot. While it took some work to get all the right settings dialed in (some fiddling to get the self-leveling bed recalibrated, bed temperature to 50C, a layer of glue stick on the kapton tape, and no brims or rafts; they just waste time and filament now), and it's not technically necessary for the PLA filament I usually use, the difference is quite stunning. Indeed, I'd basically recommend that anyone getting into 3d printing spring for the heated bed up front. It makes one of the most annoying problems in 3d printing go away instantly.

Saturday, July 30, 2016

More Coasters


Two more coaster things. First, a Wonder Woman I'd done a while back in marble, but never got around to doing any treatments on.


Not horrible, but the lines dividing the parts of the Ws didn't come out cleanly.

Then another Corian experiment. Rather than the 2.5d engraving I did on previous coasters, this was full 3d, using a design I found on Thingiverse, scaled down suitably.


Two colors of sparkly India ink on this one. Not bad, though I was off by a millimeter or two on the size of the stock I was using. I'm considering filling the carved area with clear epoxy to make a flat surface over the whole thing.

Friday, July 22, 2016

Corian

Earlier this summer, I got a few samples of Corian, the countertop material, from an artist friend to try in the CNC machine. How'd it go?


Quite well. It carves easily and cleanly, and it neither eats bits nor burns out my motor like stone does. The above piece has a small problem with some drifting along the Y axis, but that's a problem with the hold-down solution I was using. Would use again.


Tuesday, April 26, 2016

Friday, April 22, 2016

Definitely The Light Side

So this was fun. Start with a design from Thingiverse, use netfabb to slice it into bits, print, and paint. The "blade" is a simple separate design, sized to fit in the hilt piece and made from glow-in-the-dark blue filament.


But the pommel? It comes off. It stays quite snugly on the USB plug.


 And I'm sure you can see what's happening.


That's a pair of UV LEDs powered by the USB drive. And since it's the glow-in-the-dark filament, it keeps fluorescing gently for a while after the drive is unplugged.


Saturday, April 16, 2016

Where No Drive Has Stored Before

Another little thumb drive.


The design should have some familiar elements. The disk on top, the nacelles along the sides. Pretty standard original series Starfleet stuff, right? Cute.

Now, let's plug it in (and dim the lights, since this is a new camera which I haven't figured out entirely yet).


This is my first foray into not just casemodding, but actually messing with the electronics. The core of what's going on behind the scenes is in this diagram:

If you look closely into a USB plug, you'll see that there are four contact strips in a row. The two in the middle are where the data comes in an now. The outer ones provide power you can use for your own applications. They're the reason you can charge your phone through the same socket you might use to get upload/download data or plug into accessories. But what I wanted here was to light something up. Unlike earlier drive cases I've made, this one has actual infrastructure, looking a bit like this:


Internally, the case is hollow and divided into three compartments. The center is about the width of the drive itself but a bit longer. The nacelles are hollow as well, just wide enough to accommodate some 3mm LEDs. There are walls dividing them, but I thinned them out where the arrows are in the diagram above, leaving gaps for wires to pass through. Using wire glue (rather than soldering; I'm not a steady hand with the iron and don't want to inadvertently fry the electronics, I connected the "hot" contact to a resistor and the resistor to two wires leading the the LEDs in the nacelles. The ground-end leads from the LEDs were long enough that I could bend them to where they'd make contact in the middle (using a slip of paper to insulate the drive from the bare wires above) and then run a single wire to the ground contact. Took a bit of doing to get everything to work in the tiny space allowed, but, hey, lights.


Tuesday, March 29, 2016

More Drives


It's a frivolous thing, but I like putting thumb drives in unusual cases.


Both have 3d-printed cases, with assorted gears, nails, and other components added on, and the one on the left has a window for the drive's integral LED. More interesting than the rather drab plastic boxes they come in.

Saturday, March 26, 2016

Wind-Up Thumb Drive

Not really, but it looks like it. I do enjoy doing cases for thumb drives.


The main body of this steampunky little number was 3d printed, then painted and various parts applied. The "hub" has an opening down into the body of the drive so you can see if its integral LED is blinking.


Saturday, February 20, 2016

I For One Welcome Our New Breakfast-Making Overlords

At long last, the Pancakebot we got from the Kickstarter arrived, and it's pretty much what you'd expect. It's like a 2d version of a 3d printer, laying down a single layer of pancake batter onto an integral griddle. The makers also provide a simple drawing program which is a sort of minimalist CAD/CAM package specifically designed for the Pancakebot. It lets you work in four "shades" of pancake. Depending on the darkness you select for any given line or area, it'll stagger when those lines are extruded onto the griddle. Darkest lines are first, then it pauses to let them cook, then the next lighter batch, then another pause, and so on. The nifty thing here is that ultimately the Pancakebot speaks gcode, the language (or family of languages) used by CNC machines and 3d printers. In theory, I could come up with something which converted, say, .dfx files to gcode suitable to the Pancakebot, and bypass the manual drawing interface altogether.

Now, some of the cooking process is manual. Notably, the griddle temperature and the pressure at which the batter is extruded are set with separate controls with no connection to the pancake CAM. That's probably a very good thing. Variations between batches of batter mean that you'll need to make countless small manual adjustments as you go. In our case, the batter ended up quite thin, which means I had to crank the pressure well down from the medium level I started with, though the medium heat on the griddle worked quite well.

But enough technical details. What about the pancakes? We made a mix of designs downloaded from the manufacturer's web site and ones we worked up here. It took a bit of adjustment to get things right, but once I had the right settings dialed in, it went consistently pretty well.


With the pressure up too high, the lines of the Eiffel Tower were almost entirely obscured.


Designed this one for the lovely and talented spouse. Came out pretty well.


Spider pancake, spider pancake,
Does whatever a spider cancake.
In the US and in Europe
Catches thieves like maple syrup.
Look out! Here comes the spider pancake!


In Soviet Russia, dinosaur eaten by you!


It's ultimately slower than pouring cups of batter on the griddle, but the scope for shape and shade is immense. We'll be doing this again. And we'll probably be tinting the batter; we've got some additional bottles on order, so we can do four-color pancaking.


Thursday, February 18, 2016

Sweet Dreams

A friend of my lovely and talented spouse is getting into cosplay. One of the things she's been working on is Peggy Carter. And given the opportunity to wear a fabulous red hat and totally punch a dude out with a stapler, who can blame her?

It happens that the shade of lipstick Peggy uses is commercially available. It also happens that one of the gadgets Peggy uses from time to time is a knockout agent disguised as lipstick:


You see where this is going, right? My lovely and talented spouse saw that someone had 3d-printed a "102 Sweet Dreams" case and thought that would be a suitable accessory. I agreed and ordered a tube of the right lipstick so I could properly measure a case for it.

I ended up making the case out of a whole bunch of pieces. There are the upper and lower halves of the case, of course (printed open end up to save a lot of time and support material), but I decided to print the cap-like ends as separate pieces for a smoother appearance. Likewise, to get a maximally good appearance for the name plate, I printed that as a separate bit and attached it rather than having that imprinted into the side of the printed design.


So, works pretty well. The bottom is snug enough to hold the original lipstick without having to shove it in, and it comes out reasonably easy for replacement.


Thursday, February 4, 2016

Coaster Addendum

Finally picked up some red ink, so I could complete two of the marble coasters.


Yes, I think that works.


Sunday, January 31, 2016

Diamond Distribution

The work with stone I've been doing has been marvelous fun, but there's a significant problem: like math, stone is hard. The carving has to go very slowly, taking very shallow cuts, and it is absolute hell on the bits I've been using. Carbide is great material for wood, plastic, and even some metals, but rock? I can easily kill a bit even on a small piece like the "noncompliant" carving.

So on a tip from the assembled wisdom of the internet, I decided to try a diamond bit. I happened to have a narrow diamond bit intended for engraving for a Dremel tool, which just happens to use the same 1/8" collet as most of the other bits I'm using.

Turns out that it works wonderfully. Working stone still requires slow speeds and shallow cuts, but I could turn up the speed a little bit and double the nearly-negligible depth per pass. Now, twice almost-nothing is still not very much, but it's still effectively halving carving time, which saves tremendous wear and tear on my router.

I decided to make some appropriately themed coasters for my lovely and talented spouse. I laid out the designs to carve a bunch of different symbols within a grid, getting all the carving done in one long job so I could move on to concentrate on post-processing later. I started with cheap slate tiles from the hardware store, but slate's limitations quickly became apparent. The natural variation in the surface of the slate, which is one of the things that makes it attractive, turned out to be greater than the depth to which I was cutting (about 0.8 mm). There were spots where I got no carving at all because the bit never got as far down as the stone, and at least one other where the stone was sufficiently thick that I ended up carving into much greater depth than intended and ended up snapping the bit. Is OK; I had a spare. Next up was white marble tile. The flat surface proved much friendlier to carving.


For post-processing, I experimented with a few more things. I had some metallic ink in dropper bottles, so I tried filling the carved recesses with it. Turns out that works pretty well, too.


I probably should have cut the coasters up first before using the ink, but it turned out OK in the end. Instead of taking the extra time and bit wear to have the CNC machine carve the coasters out all the way, I just pulled out the trusty old tile saw (though I did have the CNC lay down some guide lines). The only real problem I had is that one of my few successful slate pieces flaked a whole layer off the bottom. That would have been a problem had I been worried about thickness. The ink, while not water-proof, was sufficiently water resistant that I could clean them up with a quick rinse and wipe. A little adhesive felt on the bottom, and...


Some of those are unfinished. I realized too late that I don't have red, so the Superman and Flash ones will need a bit of work, and I've got a Huntress likewise awaiting purple. However, I think the carving went well here.