Saturday, December 5, 2015

In Which 3d Printing Saves Christmas

Certain persons I am married to have a nativity set to which there is considerable sentimental value attached.

 If it looks a bit worn, it's because it's probably older than anyone reading this. Possibly their parents. Maybe their grandparents. It was a wedding gift to Stephanie's grandparents when they got married, the same day the Americans and Filipinos recaptured Manila from the Japanese.

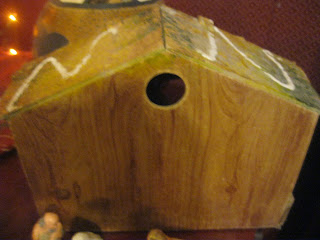
The barn/animal shelter part of the set has a little hole in the back where a light can be put in and shine through the star-shaped opening in front, for the better guidance of a trio of either monarchs or Zoroastrians.


In past generations, they'd used a cord with a single Christmas tree light to light it up, but in the 21st century, I figured it was time for something better. By which I mean, of course, time to throw vastly too much technology at the problem.

We had some battery powered tea lights kicking around, which seemed about right, but how to get one to shine through the hole? My first thought was to make a tall stand for the light with the 3d printer. However, that turned out to be just slightly bigger than the largest dimension my printer could handle, so I had to rethink the design. What I settled on was a holder for the tea light with a little clip on the front so that it could hang on the edge of the hole. It's ultimately a better design, since it uses far less material than the freestanding approach would have.


Turn it on, and you get the warm flickering glow of a far-off nova shining on a bunch of plaster figures.


So merry cookie season, everyone!

Sunday, October 25, 2015

Art Deco Switch Plate

Every since we moved into this house, over a decade ago, we've had the dull old plastic switch plate which was here before us. With the 3d printer, we can't very well have that, now, can we? However, unlike the Doors of Durin in the dining room, certain persons I'm married to wanted something better fitting the age of the house (constructed in 1930). I dug up some art deco designs and went through the usual process to turn that into a 3d shape, then superimposed that on a two-gang switch plate design.


The material for this one was a very different color, but I was lucky to find a can of spray paint in almost the exact same color we'd painted the wall when we moved in. To get the gold on the raised portion, I put a thin layer of gold paint on a piece of foil and pressed the switch plate against it, getting gold on the raised portion. I think it came out pretty well, looking a bit aged but matching the room's gold-and-red color scheme.


Tuesday, October 20, 2015

Monster Tokens

For anyone interested, I've posted files for basic monster tokens for Castle Panic. Not much in themselves, but they can be combined with monster shapes for DIY miniatures.

Friday, October 2, 2015

Monsters, Monsters

We don't (yet) have a true long-term solution to the wear and tear we put on our Castle Panic monster tokens, but I've got a possible one. The Wizard's Tower expansion introduced the idea of placeholder tokens. The big monsters get triangle tokens to be put in the bag with the others for random drawing, and when they're selected, they're replaced on the board by the real tokens, which are other shapes (pentagons for the 5-point dragon and chimera, for example).

So, then, with a little 3d printing, I can extend the idea to just about all the monsters. I worked up a basic token-shaped template, made versions with different sets of numbers (every range from just 1 up to 1-4), and started to combine them with various monster models downloaded from Thingiverse. Some of the monsters I've found are big enough to cause problems with my underpowered computer, but there are a bunch of miniatures games which provide very useful critters.

Here, for example, is an ogre:


And here's a troll:


The nifty thing about the troll is that a fire token fits on his axe:


I've only done a few so far (troll, ogre, and goblin cavalry), but eventually, I can probably get enough to replace all of the monsters.


Sunday, September 20, 2015

Have I Mentioned We Play A Lot Of Castle Panic?


We do. A lot. To the point where we've had to order replacement cards when our first deck became unusable, and we've just ordered replacement tokens, which are largely illegible now. We use 3d printed walls and towers because the cardboard ones are falling apart. The board is also a mess, and has long been held together with tape. I've been working on a solution for that, and it's finally ready. This one combines work with the CNC machine with the 3d printer in one big and hopefully durable last-Castle-Panic-board-we'll-ever-need.

With a 22" diameter, that's 380 square inches of monster-killing territory.

The board is made from six wedges of half-inch birch plywood. I used a V-bit to inscribe the ranges and arcs, then switched to a standard 1/8" bit to do the deeper cutting. Each wedge is colored with an appropriate stain all the way out to the forest ring, which is useful because the green background color all away around at that range was sometimes confusing.


To hold the wedges together, the CNC machine cut out half-butterfly shapes at the edges of the forest and castle rings. The shape can then be clamped with a 3d-printed part, holding it securely (a technique which goes back a long way; my Classical education proves useful for something!).


Each forest-ring clamp has its own decorative bit, such as the fanged skull and ruined tower here. The castle-ring clamps are flat, since decorations would interfere with the all-important walls and towers. For the numbers associated with each individual arc, a quarter-inch hole at the outside of the forest ring fits a 3d-printed peg with a number on it.


A ruined temple (using the mineral filament) and weird Aztec-looking tower (regular filament, just painted) here. We've been using the monster-themed cups to hold dead tokens for a while now.


Stone-textured fanged skull and capital here (again, regular PLA filament, just painted).

And when the game is finished, we can take out the clamps, stack up the board wedges, and put them away somewhere until next time.

Still no similar long-term solution to the worn tokens; this may not be the last time we reorder. However, between the Bocusini and the Pancakebot we've got on order, we've got some ideas about very, very short-term solutions.


Friday, August 28, 2015

Doors of Durin Addendum

I had another go at the Doors of Durin switchplate with some modest tweaks to the print settings. As hoped for, I got less stringing (and therefore less cleanup after the fact) and less curving on the printing plate. And I hit it with some stone-texture paint before the glow layer. Yes, much better.


Sunday, August 23, 2015

Speak Friend And Enter

 There has been a much-deserved to-do of late about these Frankenstein-style knife switches. They're lovely and I've run one off for one of our rooms, but between several other decorative switch plates we've already got and a limited number of suitably placed standard-switch switches in the house, I can't find a lot of places to put them. For example, in the dining room, we've got a rocker switch rather than a standard one. So what to do? Well, make my own, obviously.

The large open area necessary for the rocker switch suggested a spot suitable for an arch or doorway sort of motif which, being who I am, led to an obvious conclusion. I combined somebody else's slide-rocker switch plate design with an image which I ran through the same extruding process I use for cookie cutters and got this:


The Doors of Durin plate wasn't too difficult to design. The image is readily available and the process is, for me, well defined by now. There were some adjustments to make to the design, shoving the crown and anvil up a bit and removing some free-standing bits of the design out of the way because they take up room where the switch is supposed to be. The design is also complex enough that it strained the capabilities of my hardware. I could make a change and then come back five minutes later to see it take effect.

The print was more difficult. The plate is about as large an area as my printer can handle, so the usual tricks to prevent curling don't work well. I switched from a brim (no room around the edges) to a raft which sorta worked, but the raft curled enough to make it difficult to smush it into the underside of the plate, so it was difficult to remove in spots. Also, I somehow turned off retraction, so I had a lot of stringing to clean up. Still, seems to have worked OK.

Oh, and there was one other bit of post-processing I just had to do. It glows in starlight, right? Well...


Thank you, glow-in-the-dark paint.