Tuesday, January 19, 2016

Noncompliant

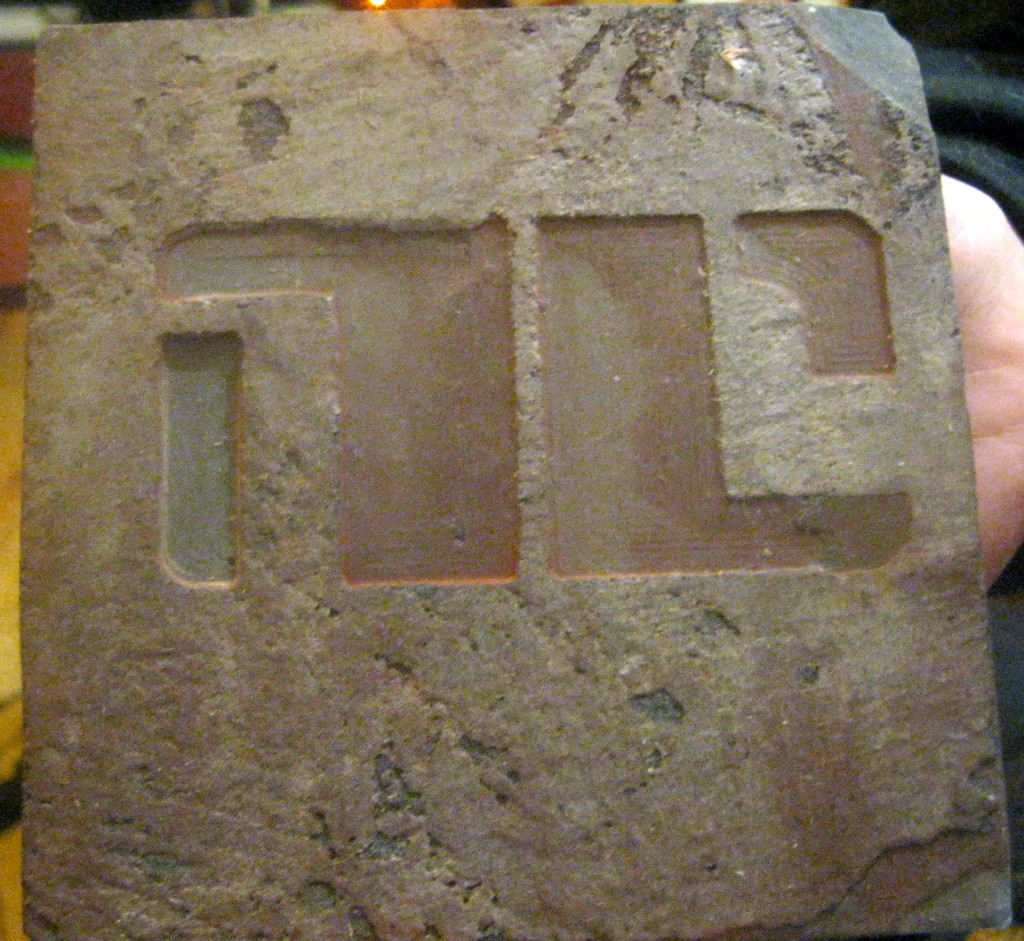
One last bit of stonework:

Photo by my lovely and talented spouse. Don't tell her what to do.

Those familiar with comics will recognize this as the "noncompliant" logo from DeConnick and De Landro's Bitch Planet, carved into a piece of slate. This run used very shallow layers (cutting 0.003 in. at a time) to a mere 0.05 in. deep. You don't need a lot of depth to get some decent contrast. I'm considering getting a dropper of india ink or something to color in the letters. Still, you can tell if you look closely at the textures (or at least I can tell) how ongoing wear is affecting the bit through the run. I'm looking at carving some square-foot slate floor tile into 4 inch squares for use as coasters. Slate, by the way, it quite porous and lets water through easily, so as a coaster, it is, dare I say, noncompliant.

This piece is also notable for temporarily killing my router.  The stone carving I've been doing lately has involved running it for hours at a time at high power. The brushes in the router (actually blocks of carbon used to run current through the spinning parts in places where a wire would snap instantly) have finally worn down to the point where they can't keep contact. Fortunately, they're cheap to replace, so I should be up and running again soon.

Sunday, January 17, 2016

"Inlaid" Stone Carving

This is something I've been wanting to work with for a while. It's relatively easy to get contrasting colors when engraving or carving. Just paint or stain the surface; the area which is carved away will reveal the original color of the material. But I wanted to do it the other way around: leave most of the material the original color and fill in the carved bits with something else.

The obvious dodge here is to mask the entire surface with something that'll stick around during carving, throw paint/stain/whatever at the piece post-carving, then remove the mask which has been protecting the original surface. But how to do that, exactly?

This probably would have been easier if I'd started with wood rather than stone, but that's where I went with it. My first attempt was to use painter's tape. That didn't work at all. The milling goes just fine (Carbide bit a lotsa rpms? Yeah, a little sticky paper won't slow it down.), but the tape doesn't stick well enough. It started peeling up around the carved areas pretty quickly. Next approach: wax.

Step one was to shave a bunch of flakes of parafin wax.


Then get a garden variety marble floor tile and put the wax on it.


I heated the tile in a very low oven to help the melting process, but most of the work was done with an iron, protected from the wax by a layer of foil. That worked remarkably well, though I had to add a bit more to the corners.


Once, the wax cools (which is pretty quick this time of year), it's off to carving. I zeroed my Z-axis to the surface of the marble. Like the tape, the thin film of wax offers no appreciable resistance to the carving bit.


Once the carving is done, there's a lot of dust, so I spent some time gently dusting it off. Then I masked over the under-waxed corners and edges and hit the piece with some spray paint.


(That design, by the way, is the House Carlyle crest from Greg Rucka's Lazarus. You should read it.)

After a few hours to dry, it's back into a low oven to soften the wax. Parafin is flammable, so this is probably a bad idea and I should have used a hair dryer or the iron again.  Anyway, when it's been heated enough for the wax to soften ("Bake at 200 degrees for 15-20 minutes or until golden brown."), scrape the layer of wax and paint off, mop up excess wax, and:


Not perfect, but not bad, either. This is probably close to the best I'll be able to do, but it might help if, on the carving step, I took more shallow passes rather than one deep one (deep, in this case, being 0.02 inches), but adding up to a greater total depth so that the paint can get a bit deeper.
Wednesday, January 13, 2016

Footstool

The CNC is making it a bit too easy to fill up the house with furniture.

My lovely and talented spouse is not a tall woman. Much furniture is the wrong size for her, leaving her feet dangling uncomfortably just an inch or two higher than where they should be. So, then, a small footstool was in order.

The basic shape is just a box, really, and there are lots of places on the internet where one can create plans for a box which can be happily consumed by CAD/CAM software. Indeed, Easel has a box-planing module built in. So mostly is was just a question of putting in dimensions for a box of the right size and editing out a bunch of tabs to leave the top and bottom open. To that, I added some holes for dowels in two of the faces; they support a cushion. And to make it both prettier and lightweight, I added some symmetrically placed Indian/Persian/Middle Eastern cutouts all around. Throw some sheets of wood on the CNC, glue it up, and plop a cushion on it:


I may, at some point, stain it to match the rest of the room, but not in this weather.

Thursday, December 24, 2015

I Come To Carve Caesar, Not To Bury Him

What do you get for a foodie Classics professor?

I dunno. Maybe a new tie or something.

Or maybe something else. I had to make something for someone this year, what with all the technology I've got kicking around now. The recipient ended up being the older brother. Something I've wanted to do is to make a Caesar-shaped knife block so you can stab him in the back every time you put your knives away. However, the best possible design, with a fully 3d Caesar, requires a 360-degree scan of a statue or something similar, and I don't have that. And at any rate, I'd need to do the design in chunks with the 3d printer. So I'm falling back on something simpler.

The body of this thing is several sections of birch plywood with 1/8" grooves of various widths routed diagonally through it. One was made with the CNC machine, the other with a router. Not sure which method I prefer. I get more control with the CNC, but working with the router doesn't take too long and doesn't tie up my computer for hours at a time.


The face is a piece of marble floor tile I got at the hardware store for about a buck per square foot. The design comes from an old coin. It's engraved using a v-bit and cuts a mere 0.02" into the tile. Came out rather nicely, I think.


Once all the pieces were made, it was easy to glue all the wood bits together, sand them down, and attach the marble with some all-purpose construction adhesive. Knives fit into the grooves in opposite directions, and with the stand, it really puts the "stab" into "stabat."


Wednesday, December 23, 2015

Merry Steampunked Cookie Season

Remember the Heaven and Earth Lamp? OK, probably not. I do, though. I got the biomass portion of it spruced up for the holidays.


Saturday, December 5, 2015

In Which 3d Printing Saves Christmas

Certain persons I am married to have a nativity set to which there is considerable sentimental value attached.

 If it looks a bit worn, it's because it's probably older than anyone reading this. Possibly their parents. Maybe their grandparents. It was a wedding gift to Stephanie's grandparents when they got married, the same day the Americans and Filipinos recaptured Manila from the Japanese.

The barn/animal shelter part of the set has a little hole in the back where a light can be put in and shine through the star-shaped opening in front, for the better guidance of a trio of either monarchs or Zoroastrians.


In past generations, they'd used a cord with a single Christmas tree light to light it up, but in the 21st century, I figured it was time for something better. By which I mean, of course, time to throw vastly too much technology at the problem.

We had some battery powered tea lights kicking around, which seemed about right, but how to get one to shine through the hole? My first thought was to make a tall stand for the light with the 3d printer. However, that turned out to be just slightly bigger than the largest dimension my printer could handle, so I had to rethink the design. What I settled on was a holder for the tea light with a little clip on the front so that it could hang on the edge of the hole. It's ultimately a better design, since it uses far less material than the freestanding approach would have.


Turn it on, and you get the warm flickering glow of a far-off nova shining on a bunch of plaster figures.


So merry cookie season, everyone!

Sunday, October 25, 2015

Art Deco Switch Plate

Every since we moved into this house, over a decade ago, we've had the dull old plastic switch plate which was here before us. With the 3d printer, we can't very well have that, now, can we? However, unlike the Doors of Durin in the dining room, certain persons I'm married to wanted something better fitting the age of the house (constructed in 1930). I dug up some art deco designs and went through the usual process to turn that into a 3d shape, then superimposed that on a two-gang switch plate design.


The material for this one was a very different color, but I was lucky to find a can of spray paint in almost the exact same color we'd painted the wall when we moved in. To get the gold on the raised portion, I put a thin layer of gold paint on a piece of foil and pressed the switch plate against it, getting gold on the raised portion. I think it came out pretty well, looking a bit aged but matching the room's gold-and-red color scheme.